Showing posts with label Makeup. Show all posts

Monday, January 22, 2018

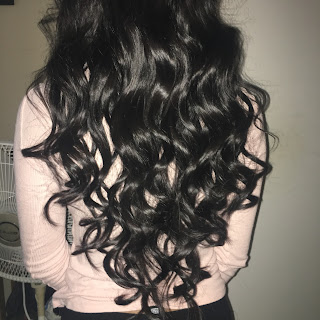
Beauty How-to: Glamorous Curls

Gorgeous Hair Curling Tutorial

I n t r o d u c t i o n

These curls will make you look fabulous for any event. For this tutorial, I will be using a 25mm, or one-inch, barrel to curl my hair. With this wand, you'll achieve beautiful curls that aren't too big and bombshell-like, or too tight and crimped-like. Michelle Phan and her novel; Make Up: Your Life Guide to Beauty, Style, and Success -- Online and Off, gives us the tips and tricks that we need to accomplish this look!

S t e p  O n e :

First, make sure to turn on your curling wand. Preheating your tool gives it enough time to warm up to the desired heat, because if it is too cold, you will not be able to form any curls because the enzymes in your hair will not be able to heat up and become flexible. But, if it is too hot, you might risk burning your hair. It is also important to figure out what kind of barrel you want, the texture and size it will leave your hair in the end. According to the book, "Smaller barrels result in tighter curls; larger barrels create looser curls," (Phan 94). Let your curling iron or wand sit on a platform that will not burn or melt. 

S t e p  T w o :

This next step is also a key for this tutorial, you want to prepare your hair. You can either use first or second day hair, as long as it is completely dry. My first product that I would recommend would be dry shampoo, to add a little volume in your hair and to absorb any oil. Any serums or mousse should be used after a shower as your hair dries so that all of the product can be absorbed and used at it's potential. Then, use a heat-protectant spray on your dry, combed hair-- the name says it all!

S t e p  T h r e e :

Now that your hair and curling tool is set up, we can begin curling. Depending on how much hair and how long your hair is, you will part it into different sections to accomplish more volume and curls. For me, I split it into 3 horizontal sections, starting from the bottom and tying the rest of my hair up so it is out of the way of when I curl and out of my face. Then, if you do have a heat-protecting glove, you can put that on now, if not, you'll just have to be more cautious about your fingers when you curl closer to the barrel. Take sections more or less about one-inch, depending on how many curls you want in the end, or how loose of a curl you want to obtain. Next, wrap the hair around your barrel and keep it in place from five to seven seconds. The longer you leave it, the more developed the shape, but if you leave it too long, you're at a great risk of burning your hair and achieving a frizzy curl. Continue to go through your hair and sections until you finish, alternating the direction you curl whether it be clockwise or counter-clockwise, this technique creates more dimension.

S t e p  F o u r :

The final step would be to rustle through your hair, loosening your curls and separating them to create more volume and texture. Flip your hair back and forth, even going upside down to create more bounce. Then, get your hair spray to finish off the romantic curls. Make sure to spray a couple of inches away and evenly distribute the product.
F i n i s h e d

Now you're ready to go! How long does it usually take you to curl your hair? Are there any tips and tricks you know of? Leave some comments down below!

Phan, Michelle. Make up: Your Life Guide to Beauty, Style, and Success--Online and Off. Harmony Books, 2014.

Thursday, January 18, 2018

Beauty How-to: Full-Coverage Routine

I n t r o d u c t i o n

With the help of Michelle Phan and her novel; Make Up: Your Life Guide to Beauty, Style, and Success -- Online and Off, We can create rejuvenated and refreshed, medium-to-full coverage look!

S t e p  O n e :

To begin, you should always start off with a good layer of primer to prepare your skin for the layers of makeup that follow. There are many different primers that benefit different skin types. Dewy primers, make you look more refreshed and full of glow, they are usually very hydrating too. On the other hand, there are primers that make your skin look matte, and usually oily people have enlarged pores, so most matte primers are multitasking, in which they minimize them. Those for oily skin, such as myself, steer towards primers that are not oil-based, for the obvious reason of not layering the amount of oiliness your skin already produces enough of. Sometimes I do mix or layer my primer, and people even use one type of primer for some areas of the skin, and a different primer for the rest of your face. Personally, I use the oil-free Hourglass Veil Mineral Primer that not only make my skin feel so silky, but it has a matte-effect on the skin, and I also use the Benefit Cosmetics POREfessional Face Primer , that gives a natural finish, minimizing pores and taking away the shine on the face. Then, according to the book, you should let your primer set for at least ten seconds (Phan 57).

S t e p  T w o :

The next step would be to color correct any blemishes. Your goal is to have a canvas that will create an even, medium to full coverage finish, and prepping your skin goes a long way. The whole technique of color correcting comes from the idea of the color-wheel. To color correct, you would choose the color on the color-wheel and the direct opposite color. A common example would be to cancel out any redness or irritation with a green concealer. Other ways color correctors are beneficial are that peach/orange concealers cancel out blue and purple undertones, which could mean under-eye circles or veins. Lavenders or purple concealers fight against yellow dullness, meaning that the concealer brightens sallow skin. On the contrary, yellow concealer battles purple and other redness irritations. To determine what tone to use, the lighter your skin, the more pastel your concealer should be, and for darker skin tones, use deeper colored color correctors.

S t e p  T h r e e :

Now that your skin is all prepped, you're now able to paint on your canvas. Your foundation should match your skin almost flawlessly, with the correct undertone, either yellow or pink. As you apply, you could either blend with a brush or a beauty-sponge, personally, I use the sponge because it feels much softer and gives me a natural finish while containing the coverage I want. Whilst you blend in the foundation to your face, make sure to also blend into your ears and neck so you don't look like you're wearing a mask. I use the Fenty Beauty Pro Filt'r Soft Matte Longwear Foundation by Rihanna. I love this brand because of how big the color selection is, and it makes it easier for beauticians to find the right shade for them. Another trick you can use is mixing foundations. You could mix two or three foundations for multiple reasons, whether it be because of the color shade it creates, or the finish or coverage that is created. Foundations can come in different forms, whether it be liquid, which allows the most coverage, powder, for a matte and lightweight feel and coverage, stick for high-opacity, and tinted moisturizers for light-to-medium coverage. 

S t e p  F o u r :

Before you begin applying your concealer, make sure you allowed your foundation to dry and set into your skin, which could take more or less 5 minutes. Then, there are various techniques to use for concealing. Spot concealing is using a concealer closer to your skin tone to cover any extra marks or blemishes on the skin, if you are lighter it would be better to use a light concealer, and for darker skins, the lighter the concealer, the greater the risk of emphasizing the imperfection. You could also use your own foundation to conceal the small areas. The next technique you could use is brightening your face with a shade or two lighter than your actual foundation. The places to apply this would be under your eyes as a triangle-like shape, the center of your forehead, down your nose, and even your chin. Illuminating the center points of your face helps give a youthful glow. With darker concealers or stick foundations, you can contour. This would be to slim down your face, so key areas would be the sides of your forehead (near your hairline), around the hollows of your cheeks, you could slim down your nose or even your jawline to create more of a defined complexion.

S t e p  F i v e :

After concealing, highlighting, contouring, whatever it may be, it is time to powder up. You want to set your cream or liquid concealers and foundation to keep them in place and give you a matte-natural finish too. Loose setting powders are good to use overall to keep the final touch light weight, or you can also add pressed-powder foundation on top to add not only more coverage, but to create the matte finish also. Loose powders come in different colors for different reasons and skin tones, ones with no color just add the setting-effect, ones that are more of a yellow or pink bases are to match your undertones of your concealer to set them. There is a technique used by many makeup gurus that is called baking. Baking is when you take a heaping load of powder and set your highlighted areas of your face to make them last longer as it sits there. Then, after a few minutes, you would brush off any excess powder and then you'll be good to go!

S t e p  S i x :

Now we have completed our medium-to-full coverage foundation routine. You can now add different accents to amp up your look, for example blush, highlight/illuminators, bronzer or contour. But, if not, your final step would be to spritz some setting spray. Setting spray locks in all of your makeup and takes away any cakey-ness that has built up throughout the process or that will in the future. There are setting sprays to help keep you matte or dewy. Personally, as a very oily gal, I love having makeup that makes my complexion less shiny then I already am naturally, so I use the KatVonD Lock-It Makeup Setting Mist. Setting sprays also aid in making your skin look more natural rather than powdery.

F i n i s h e d

With the whole routine complete, you are now photo-finish ready. Tell me about your makeup routine! Do you cut any steps? Add on? What sort of finish or products do you use? Let me know in the comments down below!

Phan, Michelle. Make up: Your Life Guide to Beauty, Style, and Success--Online and Off. Harmony Books, 2014.

Monday, January 8, 2018

Beauty 101: Lips

Products from top to bottom:
Mint Julips exfoliating lip scrub Lush Cosmetics
Ashton Liquid Lipstick Anastasia Beverly Hills
Pomegranate Lip Balm Burt's Bees
For my last blog post, I am choosing to show how to apply a liquid lipstick. Liquid lipsticks are my favorite products because they are matte. In Bobbi Brown's book, Bobbi Brown Makeup Manual she describes matte products as "Matte products are dense and last the longest. They contain less moisture than other products, so they adhere to the lips and don't fade as quickly." (Brown, 82). My favorite brand for liquid lipsticks is Anastasia Beverly Hills. I fin that their lipsticks are the most long lasting without completely drying out my lips. My favorite shade is Ashton a Brown color that is recommended for medium lips in Brown's book. She says not to use colors that are too light as they can look ashy and unnatural (Brown, 80). The other colors recommended for my lip shade are rose, pink, orange and warm red. These colors are what mainly makes up my collection of lip products.
Liquid lipsticks can be quite drying so I start out by using a lip exfoliater followed by a lip balm to keep my lips moisturized. My next step is to line my lips with a lip pencil. I used the Kylie Cosmetics lip liner in Dolce K. The point of a lip liner is to prevent the product from bleeding outside the lip. This is not necessary for liquid lipsticks but it helps serve as a guide where to follow with my applicator. The next step is to use the liquid lipstick. I outline the lips using the guide from my lip liner on the bottom lip then fill in. I press my lips together to fill in the the inside of my top lip and get rid of the excess product on the bottom lip. This is the part where I make the most mistakes is following my cupids bow. Very carefully, use the doe foot applicator to line my lips and fill in any blank spots. Once I have all of my lipstick on, I go in with a small concealer brush and clean up any messy lines around my lips. That concludes my lip routine.
The Final Look

Thank you for reading! What is your favorite lip color?


Brown, Bobbi, et al. Bobbi Brown Makeup Manual: for Everyone from Beginner to Pro.
Springboard Press, 2011.


Thursday, January 4, 2018

Beauty 101: Face Makeup

All of my products and tools
The face is the third thing I do in my makeup routine. This is to ensure that I can easily conceal any mistakes I made while doing my eye makeup and eyebrows. The basic routine I use for my face makeup is primer, foundation, concealer, powder, contour, blush then finally, highlight. These steps are one of the only things in my beauty routine that stays consistent. The very first thing you need to do before anything is knowing the undertone of your skin. There are three undertones, warm, cool and neutral. If you have warm undertones your kin is typically yellow or olive while with cool undertones your skin will lean towards blues and pinks. Another thing to look for when applying face makeup is your skin type. Like I said in my first post, I have combination skin which consists of oiliness in the T-zone and dry patches on my cheeks. The areas you have more oil you may have to powder more than if you have no oil and dry skin.
Like I said, the first step in face makeup is primer. Use a primer to help protect your skin from makeup and lengthen the time worn of the makeup. I use the Smashbox Photo Finish Primer to smooth out my skin and help my makeup apply easier to the skin. This primer is good for most skin types as it hydrates but doesn't make the skin create excess oil in doing so. Once primed, foundation is the next thing you use. For every day, I don't normally wear a full coverage foundation because I find that they can be heavy so instead I use a BB Cream. The BB Cream I use is from Maybelline Dream Pure BB Cream in Light Medium with a dense blending brush to apply this. In her book, Bobbi Brown Makeup Manual, Bobbi Brown says "The reason we wear foundation is to even out our skin tone and texture.When applied correctly, the result is skin that looks clear and smooth. But, what is most important is that the skin looks better than it did without foundation." (Brown, 56). If I am going to choose foundation over a BB cream, I use the Fenty Beauty Foundation in 200. After foundation is applied, I go in with concealer. I apply concealer to the high points of my face to highlight and anywhere I have blemishes. The Nyx Hi Definition Photo Concealer Wand in the color beige. I blend my concealer out with a beauty blender that gives an airbrushed look to my face. The next step is to apply powder to the face to set down the liquid products. I like to use the Maybelline Fit Me! Pressed Powder and a fluffy all over powder brush. This is not a crucial step and can be skipped if you do not feel the need to set your foundation however I like to set the places I am going to use other powder products since it makes them easier to blend out.
The final result
The next step is contour. You do not need to do anything after powder but my face looks flat if I don't do anything to add definition. I use the Anastasia contour kit in light to contour my cheeks and forehead with a pointed contour brush to carve out my cheekbone and apply product to my forehead then I use the same fluffy brush from when I applied powder. An alternative would be bronzer. Brown describes bronzer as a way to imitate the look of the sun and to warm up the complexion (Brown, 70). This is adds color to the face without carving out your face. Once my bronzer or contour is done, I like to add blush. I use a flat fluffy brush and the tarte Amazonian Clay Blush in unstoppable. I apply to the apples of my cheeks then blend back. Finally I apply highlighter. Highlighter exaggerates the high points of your face by using a shimmery color glow the high points of your face. This includes the cheekbones, nose and browbone. That concludes my face routine!

Thank you for reading! What are your favorite face products and how do you use them?


Brown, Bobbi, et al. Bobbi Brown Makeup Manual: for Everyone from Beginner to Pro.
Springboard Press, 2011.

Beauty How-to: Glam at the Tips of Your Fingers

Smoky Eyes

I n t r o d u c t i o n

Do you ever feel like you want to add an extra umph to your look? A great way to take your outfit, hair, and makeup to the next level would be adding a gorgeous pop of colors on your eyes. But, if you're a beginner with not many brushes or tools, or if you're short on time, I'm here, along with the aid of Michelle Phan, beauty-guru and author of Make Up: Your Life Guide to Beauty Style and Success -- Online and Off, to help you create a sultry smoky shadow to add definition to your eyes with your own easy-access tools-- your finger-tips!

S t e p  O n e :

You always want a strong foundation to build off of, and no, I'm not talking about actual makeup foundation. Before applying any eyeshadows, you want to prime your eyes. There are options such as products especially made for priming your eyes, which help the eyeshadow adhere better and also making it longer lasting. There are some eyeshadow primers that are especially made for glitter shadows, in which it is more tacky and bring more opacity for the eyeshadow. But, if you don't do eye looks very often and wouldn't use those pricey primers as much as you would want, another alternative to purchasing an eyeshadow primer would be using concealer! I use this trick all the time to add coverage and a base for my look. Then to make sure there will be no creases, set your primer with a powder that is similar to your skin tone or slightly lighter. To do this, you can use an eyeshadow, powdered foundation, or even some translucent powder.


S t e p  T w o :

Now time to build up our smoky eye. First, you want to lay down your base color, which typically is the lightest color aside from the highlight color and your skin base. Pick up the shadow with your ring finger, according to Phan's novel, "Your ring finger is the most delicate finger," (Phan 52). You will also go back in to blend all the shadows with the same fingers. This color will add a slight pop and will help the other shadows come together to look blended seamlessly. Bring up the shadow all the way to above your crease, you can call this your transition shade because you will be able to go back and forth with this shadow to add softness into your sultry smoky eye. When you've built up your desired opacity for your base and transition color, you can move on to defining the eyes.

S t e p  T h r e e :

Now we're gonna start adding in more color to bring in that smoky look that we want. This color will be slightly more of a darker brown, a warm tone. You will want to pick this up with your pointer finger, in which the book states; "The index finger provides the most control, so use it to contour," (Phan 52). The amount of control that the index finger has brings a lot of preciseness, which is good for creating a shape for your eyes, and like the author said, to contour and add depth. You want to place the shadow near the outer-corner of your eyes, and have it angled towards your brows. Then, start to bring the color more towards the middle of your eyes and in your eye crease, blending as you take the colors across the lid. Continue to blend the shadows until it looks seamless and a flawless gradient.

S t e p  F o u r :

Our creation is starting to come together, and we're gonna continue to add more shadows to make the look feel more sultry and smoky. As one of our final steps, our book guide states that; "The middle finger is for the darkest color," (Phan 52). So, we're going to take our deepest brown shade and place it on only our outer-corner. Then, blend out into the other colors to continue the seamless finish. Build up the darkness into one corner and the smoky effect will begin to come together.

S t e p  F i v e :

Now that we have built up all our colors and created a sultry look, we are going to add the finishing touches-- see what I did there? To finalize, "Use your pinky finger for the lightest shade, which will be your highlighter," (Phan 52). Take an eyeshadow that is bone-colored, or something that is light enough but won't be too opaque, you want this highlight to look effortless and just to add a little something to finish off the look. Shimmers and actual highlighters would look beautiful and add that special something to top off your makeup, but matte shadows would also add a bit of a natural finish to your eye makeup. Either decision would look gorgeous!

F i n i s h e d

Would you have ever thought that creating an eyeshadow look could be so easy, I mean, it is at the tip of your fingers! It may be a little messy, but trust me honey, the picture-perfect finish is worth it. What other colors would you try for this look? Do you prefer a matte look over shimmer and glitter? Let me know your thoughts down below!

Phan, Michelle. Make up: Your Life Guide to Beauty, Style, and Success--Online and Off. Harmony Books, 2014.

Sunday, December 31, 2017

Beauty How-to: Simple Nails

Easy Holiday Nails


I n t r o d u c t i o n

"Nails take any old outfit and make it new" - Essie.
Nails. We use them for various tasks throughout the day, actually styling them is just an afterthought, right? But what you don't realize is that the simplest nail polish can take your outfit to a whole new level. From a solid color, to glitter, to accents and nail art, there are millions of ways to create a nail set that suits you! Not only does nail polish give you that pop of color that compliments your clothes, but it also gives a shield that protects your nails from any damage. There are also some polishes that are multi-purposed. Some infused with argan oil that is rich with vitamins that keep your nails healthy. For the holidays, I wanted to keep my nails coated with a nice solid, shiny maroon polish. With the help of YouTube beauty-guru Michelle Phan and her novel, Make Up: Your Life Guide to Beauty, Style, and Success-- Online and Off, I've collected some tips and tricks to help you for this tutorial!


S t e p  O n e :

Before you begin any painting, you want to decide on what kind of look you want to go for. For me, I wear a lot of red, so I know that the polish I chose would compliment any of the different outfits that I prepared for my holidays. Also, you want to make sure you have a good canvas. Prep your nails by cutting them the length you want them, and the shape you desire by filing your nails. I like my nails a little long, and oval-like. To keep your nails strong and healthy, there are vitamins you can take, and even serums loaded with vitamins and minerals.

S t e p  T w o :

To create a strong nail look, you need a good foundation. Base coats are the base, the primer to your canvas. These clear polishes prepare your nail for the following colored nail coats. This base prevents staining, and some even are hydrating and not only protect your nails but keep them healthy also! As said from the book, "This [base coat] will protect your nail bed from discoloration and extend the life of your manicure," (Phan 101). I used an affordable 3-in-1 base coat to prepare my nails. Then, I allowed both hands to dry for at least 5 minutes to make sure my nails have absorbed and dried the coat.

S t e p  T h r e e :

Now we can get to painting our canvas. I chose a deep red because I felt like it matched the winter-holiday feel that I wanted and that would also go with all the red dresses I was planning to wear. As you paint, you want to make sure your brush isn't too loaded with polish or else your nails will become clumpy and overflow. But, you also want to make sure there is enough polish or else it will look streaky and uneven. Start at the cuticle and use light pressure to spread out the brush slightly to accomplish the most coverage. You want to have the least amount of strokes so every layer of polish will be thin and buildable. Wait at least 10 minutes for both nails to dry down completely and build up layers for your desired opacity.

S t e p  F o u r :

For our last step, you need a top coat. A top coat is a clear polish that seals down the other layers and adds another shield of protection that also adds a gloss to finish off your look. Similar in look to normal clear polishes, but don't get them mixed up! Clear polish does not have the same benefits as a basic top coat, it only adds the shine. Swipe a coat of any top coat to conclude this holiday look. I used my 3-in-1 base and top coat because of it's multi-purpose. Then, finish off my using nail polish remover and a small synthetic brush or cotton swab to clean up any small mistakes.

F i n i s h e d

You know what they say, your feet and hands never take a day off, so take care of them! Pampering yourself to add beauty doesn't always mean manicures and pedicures, but just a hint of color can go a long way. What are some other tips and tricks you've heard of for nail care? Are there any other designs or patterns you would want to try out?

Phan, Michelle. Make up: Your Life Guide to Beauty, Style, and Success--Online and Off. Harmony Books, 2014.

Friday, December 29, 2017

Beauty 101: Eyeshadow

The finished look 
Eye shadow is a powdered cosmetic used on the eyes to provide definition or color. In Bobbi Brown's Bobbi Brown Makeup Manual, she explains eyeshadow as to be used to help accentuate the eye and make color stand out (Brown, 94). I will be using a mix of dark shades to accentuate my eye and oranges and reds o make my brown eyes stand out more. I will also use a couple different formulas of eye shadow.
For this tutorial I will be using the She palette by Colourpop Cosmetics.
Step 1
1. Start by putting an orange color in the crease. This will act as a transition shade. Transition shades are useful for eye makeup by providing a color that makes darker and more bold shades easier to blend and look smooth over the eye. I used a fluffy dome-shaped blending brush for this.
2. Next, I used a red color in the crease and outer corner of the eye. This is the darkest color used. A denser brush than the last works better for this because I want this color to be more bold and pigmented rather than the transition shade that I wanted lighter and blended out further. Because this color is still in the crease, I wanted it to be blended smoothly with the transition shade so I made sure I used a fluffy brush rather than packing brush that is used for packed, intense color on your lid.
Step 2
3. The next step is to use a shimmery pink shade over the bare space on your lid. I used a flat packing brush for this since only the edges needed to be blended out from the lid. Once I picked product up on the brush, I used rosewater spray to intensify the color. After the pigment was placed, I used a blending brush to blend out the harsh lines.
4. Once the top shadow is done, I used a small brush described by Brown as a "Eye Smudge Brush: A small-head brush with a slightly rounded point. This brush has soft, flexible bristles that help smudge liner to create a smoky look" (Brown, 12) to add the orange color we started out with and the red shadow from the second step under my eye from my outer corner to the further end of my iris.
5. The final step is to add mascara and false eyelashes. I used the Ardell Soft Touch Wispies 162 Black and the Loreal Lash Paradise Mascara to add volume and length to my naturally stubby lashes
Step 5
Step 3
Step 4
 Have you ever used eye shadow before and if so, how did it go?

Brown, Bobbi, et al. Bobbi Brown Makeup Manual: for Everyone from Beginner to Pro. Springboard Press, 2011.

Thursday, December 28, 2017

Eyebrows

For me, eyebrows are one of the most important parts of my makeup. Eyebrows frame your face and provide definition. I have dark hairs but very sparse brows so I use a variety of tools, going from top to bottom I use a brush and pomade when I want my eyebrows to look darker and more defined, a brow pencil for everyday when I want to have my brows full but not as dark as what the pomade does and concealer with a small detail brush to outline my brows an clean up some of the mistakes I may have made. In her book, Bobbi Brown Makeup Manual, Bobbi Brown mentions that the start of the brow should follow an imaginary line following the outside of the nose to the inside corner of the eye (Brown, 90). Another way you can find the shape of your brow is by following three imaginary lines that can guide your shape. Start from the side of your nose and imagine an imaginary line that goes through your inner corner of your eye and to the start of your brow, another from the side of your nose through the pupil to show where your arch should be and the last one using your nose and outer corner of your eye to where your brow should end.
Now that you have your shape, fill your brows in. The materials mentioned before are what I like to use to fill them in however there are also brow gels and powders that you can use. To use an eyebrow pencil, Brown says, "Using an eyebrow pencil in a shade that matches the brow color, fill with a light, feathery stroke, mimicking the look of hair." (Brown, 92). To start filling in, I outline the bottom of my brow then the top using my pencil then using those light feathery strokes that Brown mentioned earlier to fill my brow in. Once hey are full, I use a spoolie brush through my brow hairs and soften the lines used to fill in my brows. Once they are a nice fullness, I use my concealer and detail brush to outline my brow clean up some of the mistakes I may have made. Once my concealer is blended I am done with my eyebrows.

Do you fill in your brows regularly?


Thursday, November 30, 2017

Beauty How-to: Quick Night-time Skin Prep

End of the Day Skin Care


I n t r o d u c t i o n

Let's be honest, after a long day of school, work, whatever it may be, you just wanna hit the hay... but stop right there! Going to bed with makeup on your face, no matter how much product, it's one of the biggest beauty crimes anyone could commit. I'm not gonna lie, I've fallen victim to this crime... but I've done the time, and it was definitely not worth it! My skin consequently ended up breaking out, which no one ever wants, right?

Michelle Phan, a YouTuber and beauty queen, is the author of the novel Make Up: Your Life Guide to Beauty, Style, and Success -- Online and Off. From this, I've collected some tips and tricks to make your night-time routine quick and easy!

S t e p  O n e :

Removing makeup as said, is essential before bed. Not only does it remove initial impurities, but it also makes it easier to cleanse and wash off all the remaining oils and product, thoroughly getting off all the dirt and pollution on your face produced throughout your long day. Makeup removers come in various forms, whether it be face washes, water/oils, or even wipes. Personally, I use a micellar water paired with cotton pads, which comes in handy when I want to feel refreshed and I can decide how saturated I want of a remover, depending on how heavy my makeup is that day. The micellar that I have is specially made for people with oily skin. According to the author, "At the very least, use makeup remover wipes or towelettes and give your face a quick once-over," which was followed by "If you buy wipes that both hydrate and remove makeup, you can skip moisturizer and straight to bed," (Phan, 37). 


S t e p  T w o : 

We've all been there before, we all just wanna get this over with and get our beauty sleep, so I'll keep this routine short and sweet. Whether you have normal skin, dry skin, even oily skin, you should always moisturize! Everybody has different skin, but luckily there are plenty of products out there to accomplish what's right for you. Beauty guru, Michelle Phan, goes over the types of moisturizers that suit each complexion type. For dry skin, you want something packed with nutrients, so steer towards rich and creamier formulas. On the other hand, oily gals should gravitate more towards lighter formulas that do not contain oils, such as water or gel based moisturizers. As for me, I have extremely oily skin, so I try to use the lightweight formulas to hydrate my skin. Products that I recommend for girls with similar skin to me, would be the Clinique Moisture Surge and the Neutrogena Hydro Boost. 

F i n i s h e d

Just incorporating these two-steps makes the probability of break-outs less likely, and you'll also be able to sleep peacefully without the smearing of all your makeup and dirt onto your pillow cases. I know this routine keeps everything quick, easy, and straightforward, but I wanna know, what's your nightly skin-care routine? Do you add any other steps? What kind of products do you use?

Phan, Michelle. Make up: Your Life Guide to Beauty, Style, and Success--Online and Off. Harmony Books, 2014.

Beauty 101: Skincare


The most important part of beauty and makeup is to make sure that the products you are using are good for your skin. The way we can correct this is through skincare. I personally have problematic skin but through guidance, it has become better. The first step to skin care is knowing your skin type. In Bobbi Brown's book, Bobbi Brown Makeup Manual, She explains a self-analysis of how to recognize your skin type. Brown says "An accurate skin analysis will help you determine the most effective cleansing, hydration and makeup products for your skin type and condition. However, when problem skin shows no improvement, see a dermatologist." (Brown, 32). 


I determined, through this analysis that I have combination skin. As you can see, I have oiliness on my forehead, nose and chin (T-zone), also where I have my breakouts and larger pores and dry patches on my cheeks where it feels tighter. Brown says that a gel cleanser and a moisturizer containing alpha hydroxy acids is most beneficial to combination skin types (Brown, 33). After reading, I realized that my skincare routine does not follow these guidelines that are beneficial to me so I decided to start fresh with a new routine.

Before
After
The Mario Badescu Enzyme Cleansing Gel, DIY apple cider vinegar toner and First Aid Beauty Ultra Repair Cream Intense Hydration Cream (pictured top right) now make up my skincare routine and this is the best my skin has looked in months. As you can see, following this advice has cleared up my skin a little bit in the past couple weeks


What skin type do you have and what are your favorite products?

Resource: Brown, Bobbi, et al. Bobbi Brown Makeup Manual: for Everyone from Beginner to Pro. Springboard Press, 2011.

Saturday, January 28, 2017

The Perfect Fit For You

Finding The Peanut Better To Your Jelly

Simply Glamorous: Gary Cockerill

You may have asked, "Wow Tia, your makeup skills are beyond beautiful and I love looking at your blog posts, but I wanna start doing makeup, but what colors suit me?" That is a wonderful question you should ask because you wouldn't want to have a foundation that isn't your skin tone to start with. Makeup is used to enhance your beauty, because everyone is unique in their own special way.
As my last blog post, I want to help you find what suits for you, and what makes you feel as beautiful as can be, from what colors to use to learn what you should do to enhance your natural beauty.

To Find the Perfect Eye-Shadow Color for your Eyes, Hair, and Skin Tone-

Text:
" Eye color
Brown Eyes - Coppers, ambers, grays, charcoals, purples, greens, peaches, bronzes, teal, navy
Blue/Gray Eyes - Peaches, purples, silvers, pink tones, oranges, coppers, bronzes, golds, slate
Green Eyes - Burgundies, berry tones, purples, rusts, mauves, plums, apricots, grays
Hazel Eyes - Purples, rich golds, yellowy browns, dusty pinks, grays taupes
Skin Tone
Light - Silver Hues, subtle washes, soft tones 
Fair - Taupes, browns, golds, soft tones
Medium - Greens, plums, purple, golds, gronzes
Dark - Red tones, taupes, bronzes, golds, purples
Deep - The most pigmented colors, rich purples, deep red-based tones, nothing ashing or too pearlized
Hair Color
Brunette - Browns, golds, green purples, black
Blonde - Golds, pinks, grays, black, greens, blues
Red - Pinks, golds, greens, olives, black" (Cockerill )

Paraphrased: 
This quote is stating what eye shadow colors is the best color for each type of eyes, skin tones, and hair color.

Impact:
Personally, I started off only using bronze colors, cause it was something I would always reach for, because it was the first color of eyeshadow I got, and I constantly always use. I never would have thought that green, and purple eyeshadow would ever look good on me. It never seemed to cross my mind about using those certain colors. It had expanded my horizon and my view on makeup, because now I have learned that greens and purples work good with my skin tone, hair, and eyes.

Dark Purple Eye Look 

Creased Purple Eye Look 


Text: 
" Be brave. Don't dismiss a color, texture, or look until you try it. You may be surprised to discover that something you always thought would never suit you actually looks fantastic. Be creative. There are always ways to adapt a look to make it work for you. If you don't like the color combinations, try different ones; if you think false lashes will be too much for you, just wear mascara; if you don't want matte lips, choose a satin finish instead." 

Paraphrased: 
This quote is stating that you shouldn't stay in the same color range, or use the same eye-shadows constantly, because you won't be able to find color textures, or colors that would work with your skin tones and or physical features. Also, try different color combinations and different types of textures. Plus, don't be scared to experiment with lashes. 

Impact:
I have always used the same color scheme over and over, bronze, bronze, and of course more bronze. I never had really experiment with anything else. Then eventually, I started to change it up a bit. Also, I never really use lashes, but lately, I started to become very into lashes, and use them all the time in all my looks. So without going out of my comfort zone, I wouldn't have found something I end up loving.

Question: Have you ever gone outside of the box when dealing with eye-shadows? If so, what color you found out works the best for you?

Peace Out,
Tia Nguyen

Cockerill, Gary. Simply Glamorous: Make-up transformations to make you look & feel fabulous. New York, NY 10010 St. Martin's Press New York

Friday, January 6, 2017

The "I Look Like I Got Punched In the Eye" Look

Smoky Silver Eye Shadow Look

Simply Glamorous: Gary Cockerill

So recently, New Years Eve just passed by this week, and the typical makeup look for the staying up all night long look was silver and glitter.  Because, we all want to look like we are wearing a disco ball on top of our eyes. So grab your glitter and prepare to dazzle.
DISCLAIMER: Mentally prepare yourself for what you are going to see.

Text: "If you want to glam the whole thing up and take the eyes to the max, try glitter- it's a great way to dress eyes up for the evening." (Cockerill 109)

Paraphrased: Putting glitter in your make-up look can dress up your eyes for a more of a glam look. \

Impact: Personally, I love glitter and/or anything sparkly on top of my eye lid. Adding glitter into my look truly made it a "New Years Eve" look. It tied the whole look together. So for the major of my looks, it will involve glitter.

Text: "How To Choose Colors Brown Eyes... coppers, ambers, grays, charcoals, purples, greens, peaches, bronzes, teals, navy." (Cockerill 119)

Paraphrased: Copper, amber, gray, charcoal (black), purple, green, peach, bronze, teal, and navy colors are good colors for those with brown eyes.

Impact: Without this list of colors that are  recommended for me, I wouldn't quite know what colors to be the main part of the look. I categorized as Silver into gray since they are in a similar family group.

All in all, this was just a test run of a smoky eye, I used the colors that are suited for my eye color, and I want to have a theme all around and I decided on "New Years Eve", so this look was created.


The Finished Look

Question: How do you do a smoky eye without making it look like you got punched in the eye a bunch of times?
Answer: Obviously I cant.

Peace Out,
Tia Nguyen

Cockerill, Gary. Simply Glamorous: Make-up transformations to make you look & feel fabulous. New York, NY 10010 St. Martin's Press New York

Tuesday, December 20, 2016

Naturally Gorgeous

Natural Look
Simply Glamorous: Gary Cockerill

We all had those days where we don't want  to look like a living zombie or having our face caked on like a clown. A natural look can change what you looked like before, to a whole new different look. This look can be your "No Makeup" Makeup look. It's easier than it seems, so grab your makeup brushes and lets get to it.

Text:
"This understated neutral make-up, where all the tones flow together, looks beautiful and healthy in the day or evening. It's easy to achieve and suits everyone, as long as you pick warm, soft tones that work with your skin, a multipurpose product for the eyes, lips, and cheeks is ideal." (Cockerill 14)

Paraphrased:
To create a natural/neutral makeup look, you need to have tones that work and flow together so it looks healthy and not fake. The tones you need are warm and soft tones that work with your skin. And using multipurpose products, is ideal because they can make an even more natural look.

Impact:
Previously, before I picked this book, I would create "natural" looks. But they weren't exactly "natural" per-say. I wasn't using the right colors for my particular skin tone, I would pick up harsh tones and they would be all cool tones, which don't fit with my skin tone.  I wouldn't either go way too dark, or way too light, this was another story of Goldilocks and the three bears. So what I've learned, ALWAYS PICK THE RIGHT SHADE, FIND ONE THAT IS JUSTTTT RIGHTTT.

Text:
" ...I defined her brows with a brow powder one shade lighter than her hair, and swept an apricot eyeshadow into her socket and under the lower lash line at the outer edge of her eyes...with a coat of mascara this dressed up the eyes just enough. The lipstick is neutral and tones with the eyes...I added apricot blush to warm up her cheeks, with champagne highlighter along the cheekbones for a youthful sheen." (Cockerill 12)

Paraphrased:
Gary Cockerill used a brow powder a shade lighter for the brows, so it wouldn't be so harsh on the girl's skin. Then he used an apricot eyeshadow into a socket and lower lash line on the outer edge. Then he put a coat of mascara, so it dressed it up. And then used a lipstick that was neutral and worked with the eyes. Then he added an apricot blush to add color to her cheeks, and a champagne highlighter along the cheekbones for a youthful look.

Impact:
I have taken away from this paragraph was that using a shade lighter for your brows makes her face more lighter and not as harsh. I personally, am all about the dark eyebrows, but making them just a little bit lighter made the look seemed more put together, and you can say, more "natural".

Final Look

Question: What are your daily must-have product or something you just can't live without?
A: (Mascara and/or Eyebrow Pencil)

Peace Out,
Tia Nguyen

Cockerill, Gary. Simply Glamorous: Make-up transformations to make you look & feel fabulous. New York, NY 10010 St. Martin's Press New York

Sunday, December 11, 2016

Sun-Blazed God-ish


EYE SHADOW
Simply Glamorous: Gary Cockerill

So this is my attempt of eye shadow, not too shabby, but not great either. I've always wanted to get better at eye shadow cause it creates a look natural, smoky, bronze, and etc. So lets get onto it.

The Complete Eye Makeup 

Text:
"10) Using a medium-sized brush, I applied gold shimmer eyeshadow to the main part of the eyelid, taking it into the natural socket crease and just underneath the eye at the inner corner.
11)I added a rich rusty brown matte eyeshadow to the outer corner and blended it into the shimmer powder on the lid to create more depth.
12) To combat the slight droop of her eye lids, I used a pencil brush and the same eyeshadow to cut out a crease just above the natural socket line, following its curve.
13) I swept the same color under the eye with an angled brush, taking it from the outer corner and fading it into the gold color at the inner corner.
14) Then I used a blending brush to soften all the edges and make the colors connect, with no hard lines.
15) I applied black mascara to the top lashes and let it dry before adding individual lashes and clusters of false lashes to add fullness, followed by another coat of mascara on the roots only to add dept. (The false lashes are optional and if you're doing this look for the daytime, don't go there.)
16) I lined the upper lash line with a black gel liner, keeping as close to the roots of the lashes as possible. Then I smudged a little black eyeshadow over it, creating the impression of a shadow above the lash line, which makes the lashes look thicker. ....
18) I applied mascara to the lower lashes, holding a tissue under them to protect the skin from smudges.
19) To finish off the eye, I added a little gold pigment to the inner corner and to the very middle part of the lid, so the shimmer is visible when the eye is open. This catches the light, drawing attention to the eyes and is great for an evening look. Using a smaller brush, I also added a touch of the shimmery pigment under the lower lash line at the inner corner of the eye." (Cockerill Pg.82)

Paraphrased:
Starting off, using a medium sized brush, put gold eyeshadow all over your main port of you eyelid up to the natural socket crease. Then using a rust brown matte eyeshadow put it on the outer corner and blend it into the gold shadow which creates depth. Use a pencil brush to cut out a crease above natural socket line with the brown eyeshadow. Also using the same color, use with an angled brush taking from outer corner and fade into gold color, and blend it. Put mascara on, and apply fake eyelashes, when going out at night. Line upper lash line with black gel liner, and smudge little bit of black eyeshadow. Then apply mascara to the lower lashes. To finish, at little bit of gold pigment to the inner corner of eyes to brighten.

Impact:
Following this tutorial, I learned how to correctly apply eyeshadow. I used to do it willy-nilly, but now my eyeshadow skills have gotten better. I learned what brushes are used for what, and where the colors should be placed.

Text:
"Tip Keep your eyes open when you cut out the crease on your socket line, so you can see where you're placing it . It needs to be visible when your eyes are open to create depth and make your eyes look bigger." (Cockerill Pg.82)

Paraphrased:
Keeping your eyes open when you do a cut crease, is easier so you know where you are placing it where it can be seen.

Impact:
Personally, I can never do a cut crease or just creasing in general, I have always closed my eyes, and I would just guess, but it usually never works, and it doesn't always look great. But now, I know how to do it right, and now my makeup game is stronger as ever.


Question:  What are your must-have palettes? Ones that blend nicely, and/or pigmented.

Peace Out,
Tia Nguyen

Cockerill, Gary. Simply Glamorous: Make-up transformations to make you look & feel fabulous. New York, NY 10010 St. Martin's Press New York