Learning Origami: Pecking Crow
The sun is officially starting to come out, which means that the crows are beginning to come back to rainy Seattle. For my last blog post, I will be showing you how to make an origami pecking crow! Since the weather is beginning to improve you will be seeing many crows in the Seattle sky, Today, thanks to the book, Practical Origami: A step-by-step guide to the ancient art of paper folding I can show you simple steps to making your own origami paper crow model.
This origami crow model, created by Makoto Yamaguchi is very unique because the folds are made through two layers of paper, so when layers are separated, the folds are kept in place. This model is also unique because the crows beak can open. To open the beak, all you have to do is extend the wings outwards to open, and inwards to close. The book states, "To make the beak open you pull the wings slightly apart" (Beech 127). For this action model, the only material you will need is a square piece of paper.
The most troublesome part of making this origami piece was step four. The wording of this step was very difficult to understand, however the picture included in the step made it easier to understand. After looking at the picture, I was able to summarize the step into opening the section of paper at the top and pull the single layer, flatten the model. In the book, Step four stated, "Open the section of paper at the top slightly, and you will observe one layer inside the other. Pull out the single upper layer, separating it from the outer layer wrapped around it" (Beech 127).
Below are Eight steps to creating a paper Pecking Crow:
 |
Step One: Fold the paper in half diagonally.
Then fold into
quarters, unfold.
|
 |
Step Two: Fold the two edges to lie along the
vertical crease created in step one.
|
 |
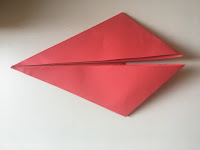
Step Three: Fold each of the
pointed flaps outwards.
|
 |
Step Four: Open Section of paper at the top and
pull single layer, flatten the model.
|
 |
Step Five: Fold the upper corner
all the way down.
|
 |
Step Six: Fold point created in
step five to the right, unfold
and repeat
to the left side.
|
 |
Step Seven: Unfold crease made in step six,
pull and squeeze
model together at the point.
|
 |
Step Eight: Turn model over and repeat
steps 5-7 on the
other side.
|
Overall, this was a very entertaining and rewarding origami piece to make. This action model was very interesting and overall, I believe that my origami skills have improved tremendously since I began creating blogs. Thanks to the book, Practical Origami: A step-by-step guide to the ancient art of paper folding, I have a newfound interest in origami and will continue to make origami pieces. There is so much more to origami than just paper folding, origami can be used as a stress reliever or even just for pure entertainment, I learned so much from this book, and cannot wait to continue learning more! For the final time, thank you so much for reading my blog, and I hope that the "Learning Origami" blog series, and the steps I summarized from the book made it easier to make an Origami pecking crow! Although this is my final blog, I hope that your knowledge from reading my posts has increased your interest in origami as much as making these blog posts has increased my appreciation for this art.
What is your favorite origami piece I have completed in this "Learning Origami" series? What did you learn from this blog?
Beech, Rick. Practical Origami: a Step-by-Step Guide to the Ancient Art of Paperfolding. Hermes House, 2006.


