Thursday, November 30, 2017

The Art of Manga: Starting Out

Starting Out 

Typically, I am an artist that jumps at realism so before finding my book, Manga Crash Course by Mina Petrovic, I had no real experience in this Japanese cartoon styled art. After flipping through a couple of pages of the cute, colorful, yet sophisticated characters, I decided to splurge and buy the book. That same day I sat down and read through multiple sections of the book, completely enveloped in this new realm of art with open eyes, a fresh mind, and sketchbook full of blank canvases. 

Now you might be asking, what is manga? 

Well, manga is the Japanese name for comic books that originate in Japan, the style of art can be divided into smaller categories that are made for different groups and ages.There is kodomo for small children, shojo for young girls, shonen for young boys, seinen for older boys, and josei for older girls. (Petrovic) 

My favorite subcategory would be josei as it tends to capture both maturity and innocence, in a very beautiful way. I would like to create my art to lean towards this category, as it is the most like my usual style of art, however starting out I think it would be best to focus on shojo, the sweet and innocent art. 

While reading the materials section, I realized I already had all the materials you need! These items include, pencils, drafting pencils, erasers, and inking pens. So let's get into the real art. 

The Female Manga Face 

The first page of the drawing sections writes, "Female faces in manga mostly look like the face of a doll, with a round face, huge eyes, and a small pouty mouth" (Petrovic 33) Contrary to my usual drawings, I knew I had to make these girls soft, dainty, and innocent, forcing me to go about my drawing in a softer way. Choosing to focus on the roundness and extenuated features really helped me to capture this doll type look. 


A side by side comparison of my usual harsh realism drawings and newly learned manga style.

Why do you think manga portrays girls as innocent and dainty? 

Which do you like more, my realism or the newly learned anime? 


Petrovic, Mina. Manga Crash Course: Drawing Manga Characters and Scenes from Start to Finish. Impact, 2015.

Beauty How-to: Quick Night-time Skin Prep

End of the Day Skin Care


I n t r o d u c t i o n

Let's be honest, after a long day of school, work, whatever it may be, you just wanna hit the hay... but stop right there! Going to bed with makeup on your face, no matter how much product, it's one of the biggest beauty crimes anyone could commit. I'm not gonna lie, I've fallen victim to this crime... but I've done the time, and it was definitely not worth it! My skin consequently ended up breaking out, which no one ever wants, right?

Michelle Phan, a YouTuber and beauty queen, is the author of the novel Make Up: Your Life Guide to Beauty, Style, and Success -- Online and Off. From this, I've collected some tips and tricks to make your night-time routine quick and easy!

S t e p  O n e :

Removing makeup as said, is essential before bed. Not only does it remove initial impurities, but it also makes it easier to cleanse and wash off all the remaining oils and product, thoroughly getting off all the dirt and pollution on your face produced throughout your long day. Makeup removers come in various forms, whether it be face washes, water/oils, or even wipes. Personally, I use a micellar water paired with cotton pads, which comes in handy when I want to feel refreshed and I can decide how saturated I want of a remover, depending on how heavy my makeup is that day. The micellar that I have is specially made for people with oily skin. According to the author, "At the very least, use makeup remover wipes or towelettes and give your face a quick once-over," which was followed by "If you buy wipes that both hydrate and remove makeup, you can skip moisturizer and straight to bed," (Phan, 37). 


S t e p  T w o : 

We've all been there before, we all just wanna get this over with and get our beauty sleep, so I'll keep this routine short and sweet. Whether you have normal skin, dry skin, even oily skin, you should always moisturize! Everybody has different skin, but luckily there are plenty of products out there to accomplish what's right for you. Beauty guru, Michelle Phan, goes over the types of moisturizers that suit each complexion type. For dry skin, you want something packed with nutrients, so steer towards rich and creamier formulas. On the other hand, oily gals should gravitate more towards lighter formulas that do not contain oils, such as water or gel based moisturizers. As for me, I have extremely oily skin, so I try to use the lightweight formulas to hydrate my skin. Products that I recommend for girls with similar skin to me, would be the Clinique Moisture Surge and the Neutrogena Hydro Boost. 

F i n i s h e d

Just incorporating these two-steps makes the probability of break-outs less likely, and you'll also be able to sleep peacefully without the smearing of all your makeup and dirt onto your pillow cases. I know this routine keeps everything quick, easy, and straightforward, but I wanna know, what's your nightly skin-care routine? Do you add any other steps? What kind of products do you use?

Phan, Michelle. Make up: Your Life Guide to Beauty, Style, and Success--Online and Off. Harmony Books, 2014.

Devil's Food Cake into Cupcakes


Devil's Food Cake Cupcakes

This recipe is used to make a cake, but I just poured the batter into some cupcake liners and popped them into the oven to make some yummy chocolate cupcakes. The recipe comes from the book, "The Williams-Sonoma Baking Book, the Essential Recipe Collection for Today's Home Baker" published in 2010. On page 152, the recipe requires:
  • 2 1/3 cups of all purpose (plain) flour
  • 1 cup unsweetened cocoa powder, sifted
  • 1 1/2 tsp baking powder
  • 1/2 tsp baking soda
  • 1/2 tsp salt
  • 3/4 cup unsalted butter, at room temperature
  • 2 cups firmly packed light brown sugar
  • 2 tsp pure vanilla extract
  • 4 large eggs, at room temperature
  • 1 1/2 cups buttermilk, at room temperature
For the frosting (I just used frosting bought from the store):
  • 12 oz bittersweet chocolate, finely chopped
  • 1 3/4 cups heavy (double) cream
  • 1/2 cup sour cream
  • Pinch of salt
Flour, cocoa, baking powder,
baking soda, and salt mixture

First, I sifted together the flour, cocoa, baking powder, baking soda, and salt in one bowl and set it aside. In another large bowl, I used an electric mixer on medium speed and beat the butter until smooth. I gradually added the brown sugar into the butter and continued beating it until it turned smooth.


Butter with brown sugar
Adding in the flour mixture

I then beat in the vanilla extract and added the eggs one at a time, making sure to beat well after each addition. After I beat in the last egg, I added the flour mixture in three additions, alternating with the buttermilk in two additions. I mixed them in on low speed. When I was done mixing the batter, I poured
Finished batter
Cupcakes in the oven
the batter into the cupcake tins and popped them into the oven at 350 degrees for 15 minutes, or until when you poke a fork into the cupcake it comes clean. When the cupcakes were done, I took them out and let them cool for 5 minutes before I frosted them (a mixture of vanilla and chocolate frosting for the right amount of sweetness).
This baking experience has made me more knowledgeable on baking cupcakes, and it made me realize I need a lot more practice before I can master the art of making cupcakes. The cupcakes in the end turned out great, and I'm looking forward to making more favorable cupcakes.

What is your favorite flavor of cupcake/cake  flavor and would you guys ever dabble in the baking world?


Diabetes: What Is It?

When I was five-years-old, my dad had been diagnosed with diabetes. Ever since then my family's meal choices have changed, and blood sugar spikes or drops cause my dad to have to eat or take insulin. He also has to take insulin before every meal so his blood sugar doesn't spike in the first place. So I've done this research to help me and others better understand what diabetes is and how to better live with it. So lets start with the first question:

What is Diabetes?
Diabetes is difficult to define as one thing because of all the different types. But when most people use this word they talk about "Diabetes Mellitus". Which is where the body cannot produce enough insulin or the body does not accept the insulin produced. So I will just cover the main types of diabetes, type 1 and type 2. The symptoms of these types are the same really, with a few rare ones thrown into the mix, but some the main symptoms of both types of diabetes is:

- Frequently having to go to the bathroom
- Excessive thirst
- Easily tired or exhausted
- Sleepy
- Extreme hunger
- Blurred vision
- Weight loss or difficulty gaining weight

What Is Type 1 Diabetes?
Type 1, also used to be known as "Juvenile Diabetes", is a chronic condition. this condition prevents the pancreas from creating enough insulin. This also causes the beta cells to not function. Beta cells are cells that recognize when even amounts of glucose are released into specific cells. So then the beta cells produce the insulin that regulate the glucose levels. Insulin is a hormone that is responsible for how your body stores and uses glucose. There are two different versions of type 1, these versions are Autoimmune Disease and Acquired Disease.

-Autoimmune Disease: Autoimmune Disease is a disorder that causes your immune system malfunctions. The immune system starts attacking good cells, thinking they're bad cells. This can cause a lot of harm to your organs and a variety of tissues. In this case the immune systems attack the beta cells, which then the beta cells cannot produce insulin, this makes the glucose levels in the bloodstream eventually toxic.

-Acquired Disease: Acquired Disease is rare. But when "acquired", it is usually because of pancreatic cancer or an accident that injures your pancreas. This is when the beta cell count is affected. The pancreas cannot produce enough beta cells to provide enough insulin for the body.

The treatment used for Type 1 is insulin injection and/or a pancreas transplant.

What Is Type 2 Diabetes?
Type 2 Diabetes is a chronic metabolic disorder. Meaning a disease that causes high blood pressure, high blood sugar, and other things that increase rate of heart disease, stroke, and diabetes. Type 2 is when the beta cells/agent in cells may resist naturally produced insulin and glucose, causing the glucose to go back into the bloodstream until acted upon by medicine.

There is a great (and long, but worth it) analogy in a book I am reading called "The Ultimate Guide to Diabetes Type 1 & 2" by Barbara P. Trisler. The analogy of the cause of Type 2 is "Imagine a pizza delivery guy, who delivers pizza for free. Every minute, he delivers a pizza to your house. Perhaps, for the first dozen boxes, you still get excited, because pizza is great. However, after a few dozen more, you would tell the pizza guy to stop delivering.
If he continues to deliver, you will stop opening the door to him, so he would send the pizza to our neighbors. But, your neighbor has been receiving the same amount of pizza and refused to accept it. The pizza guy would have no choice but to find a place to deliver the pizza. The pizza may become rotten and toxic, before e can find a new recipient, and when they eventually receive it, it causes them harm" (Trisler 39).

That is Type 1 & 2. If you have any questions let me know in the comments. I would love your feedback!

DISCLAIMER: This article provides information regarding the subject matter covered. However, information provided does NOT replace medical or professional advice. The author specifically disclaims any liability that is incurred from the use or application of the information.

Works Cited:
Mayo Clinic. Metabolic Syndrome. Mayo Clinic, 2017. Mayoclinic.org. Web. 11/30/17.
Trisler, Barbara P. The Ultimate Guide to Diabetes Type 1 & 2. Barbara P. Trisler, 2017. Print.

Sewing: Preventing Fraying


Using Heat-Bond

To make an example piece, I cut out a heart shaped piece of fabric out of Satin which tends to fray a lot at the edges and sometimes even in the middle when a needle catches a part of a thread. To prevent the fabric heart from fraying and becoming a huge mess, I bought heat-bond. 
To use heat-bond, you have to cut out a piece that would fit the size of the fabric. If you want to save heat-bond, then you could only cut out enough for most of your project, but I wanted to cover the whole piece so I cut out enough to fit it. 
To actually stick the heat-bond onto the fabric, I needed a damp towel to help the glue stick and an iron to heat up the dots of glue that are scattered on one side of the heat-bond. I placed the damp towel on the heart and placed the iron on top, letting it sit for a bit before picking it up and moving it to another spot.
Once I finished that and let the fabric cool down for a bit. I used a straight stitch, which is the best for a simple hem to make sure that nothing pulls the two pieces apart from each other by the side. Straight stitches are the most common stitch there is because it is the easiest way to sew something together(Quindt 11). After sewing around the edge, I cut off any extra material to have a Satin Heart!
"The Book of Cosplay Sewing" by Svetlana Quindt

Spanish step by step: Language

Spanish step by step: Language


My name is Kelly Kiel and since i am in my first year of Spanish, i thought it would be a good help to look into a new approach to the subject. The book starts with pronunciation of different letters to lay out the foundation of Spanish. Next were very applicable vocabulary for situations such as what you would say in a cafe.
I've come to find that Spanish is a very poetic language. The way you form sentences seems to be a slightly different approach to speaking English. I also find it interesting how masculine and feminine words play a part. A man and a women could convey the same message, but they would say the sentence in a different way; masculine words usually ending in "o", and feminine ending in "a".


Published: 30th November, 2017

Chess: Don't Use Queen Raid

By: Alex Faull

How you open a game in chess can be very critical. If you open poorly you'll likely end up playing from behind for the rest of the game, but if you open ahead, then you could dominate your opponent and end the game being able to say checkmate. Now, me and many other bad chess players (yes, I am admitting that I am bad) become focused on the queen, which isn't to surprising since the queen is so powerful. Because of this focus people tend to use an opening strategy that Yasser Seirwan in the book Winning Chess - Openings calls Queen Raid. Seirwan describes the logical behind Queen Raid, "My Queen was a natural-born bully! All that was necessary was to introduce it into the game as early as possible"(Yasser, 8). The opening strategy is simple: get your queen into play as fast as possible, and use the queen to bully your opponent's weaker pieces. And it actually worked for him, but only when was newer to the game and playing against inexperienced players.


6th turn of one of Seirwan's early games (found on page 17).
The reason this worked for Seirwan at one point is simply because his opponents didn't understand how to counter it. Because of this he achieved many fast victories, being able to win the game without moving most of his pieces. But there is the problem: he never uses most of his pieces early, so they get simply stay trapped where they were from the start. So, when Seirwan began to use Queen's Raid against better opponents, they would use their own pieces to push bully his queen by constantly placing it under the threat of capture. So while Yasser spent the opening trying to try and keep his queen alive, his opponents would simply gain control of the board by having more pieces in play. The image to the right is from one Seirwan's games where the Queen Raid failed him (Seirwan is white, his opponent is black). While Seirwan has opponent in check, he is actually at the disadvantage. Though the aggressive Queen Raid opening put the black king in some danger, black already has both knights in play, two pieces in the center of the map, a threat against the white pawn in the center (black knight on f6), and can easily move out other pieces. White has a pawn in the center, the queen under threat, a check, and pieces trapped behind a wall of unmoved pawns. Check on turn 6 is very early, but a single check isn't worth being put behind this early.

The Queen Raid has the chance to secure an early win, but you can't rely on it. So, if it's unwise to go for an early win, what is wise? What do I want to accomplish with an early opening? In Yasser's words, you want to "control the center"(Seirwan, 26). This is the underlying principle of a good opening. The reason is simple, a piece in the center has more power since it can impact more vital spaces, allowing you to better control the map. For this reason, the following is one of the most common first moves of a chess game:

 White moves a pawn forward to e4, placing a piece in the center (outlined in red), making it a critical piece on the board
Pawn to e4, an incredibly common move.
Black responds to white by mirroring white and moving a pawn to e5, allowing black to also have a foothold in the center.
Pawn to e5, another incredibly common move.

The next few turns generally involve both side threatening the pawns in the middle, protecting them, and moving other pieces into the center if given the opportunity. Though this is very common and simple, what ensues after is where the incredibly complicated parts come in, but I'm still early in the book, so I won't even act like I know what I'm doing.

I decided to try a both the Queen Raid opening and an opening based on controlling the center against a chess AI. I was crushed, every game (don't judge me, those AI's are terrifying). While I was getting crushed I did notice something: Seirwan was right about the two strategies. I tended to last much longer when I focused on the center and not my queen, being able to have some influence over the board, while when my queen was the focus I could do basically nothing but run from the enemy. So, now that we have an idea of what openings should do, next time I will begin to answer the question: How does one control the center with an opening?

Creating my own Characters Stage 1 :)

Creating my own Characters: Stage 1 Discovery

As a little kid I was obsessed with cartoons. Whether it was Scooby Doo or Spondgebob I was always fascinated by the colorfully creative worlds these characters lived in, I wondered how they came to be and who was behind these mischievous characters. As I grew up I learned about animation and bringing these characters to life on a TV screen, but it all began with a doodle from a imaginative cartoonists on a sheet of paper. While reading the book Draw with Jazza, Creating characters I remembered my love of cartoon characters the book has helped me lay out step by step how to create my characters and how to develop them.

Brainstorming my characters:
When brainstorming a character you have to go through a character breakdown process. Be clear on creating key aspects of the character both physical and nonphysical, "the characters personality will help you develop their physical attributes"(Brooks 5). Start with Personality and Motives. My characters are Vicky and Eric two teenagers a guy and girl, both are secret spies for the US government. Vicky is snarky, sarcastic with a lot of sass, and pretends to hate everyone but once you get to know her shes the softest person. Eric is the schools bad boy, he skips class, spray paints vulgar words on the side of the school building and is all around a intimating guy. Together they create the best spy group in the US, although they argue and insult each other a lot they make good friends.

Basic Body Construction
After I have envisioned my characters and i know their personalities really well I begin to sketch the physical attributes of my characters. Vicky and Eric are in their senior year of High School so they are moving on from the awkward teen stage and becoming adults and their bodies need to show that. I began to sketch Vicky, I covered all the joints, head shape, hips, and overall figure of a girl. Her curvy figure will enhance her sassy attitude and sarcastic comments For Eric I focused on a slim rather than muscular figure, height and body shaped was more important. He couldn't be really muscular because he needed to be agile and cat like to be a spy but still toned. Eric is going to be a lot taller than Vicky to strengthen their differences.


Body Structure for Vicky


While drawing a females body structure I recommend remembering that "most women have curves and that their body shape is a lot more delicate than males"(Brooks 23). Also remember that females tend to have wider hips than males.


Basic Body Sketch for Eric 

For Eric I made his body a boxed shape rather than a curve like Vicky. Remember to use more angled shapes for a male character.  In my opinion its easier to draw Eric's body because of the lack of curves.
 
Have you ever wanted to Create Cartoons? What Personalities would you give your characters? What Physical features? 

Brooks, Josiah. Draw with Jazza - Creating Characters: Fun and Easy Guide to Drawing Cartoons and Comics. Impact, 2016. 

Learning Acoustic Guitar

By Yna Costales

Open Position Chords

Okay! So, I decided to get into learning acoustic guitar a lot more for my IRP. Some background about guitar playing for me is that I got my first guitar when I was twelve and have played it on and off since then. Although, I have never really tried to learn it in great detail, so with this I hope to learn it a lot more and further my abilities in playing guitar.
This month I practiced the six basic open position chords. According to the my book Acoustic Guitar Complete "These are the most fundamental chords to all styles to guitar playing."
The open position chords includes:

  • The E major chord

  • The A major chord

  • The D major chord

  • G major

  • C major

  • B7 chord

This is a Picture of me practicing the G major chord.


This is another angle of the G major chord. In order to play the chord cleanly you must play on your fingertips, holing your finger perpendicularly to the neck. It is also important to keep your fingers from interfering with strings that they are not playing.


Relearning these chords was a little tricky for me. It's important to press down all the way when playing chords. Otherwise, when you strum, the chord won't sound clean (I had a lot of trouble with this). It's also important to know when you're first starting out or coming from little experience when playing the guitar that you will most likely sound pretty bad, but with patience and persistence you will gradually get better.


Soccer Basics

         Soccer is by far the most popular sport in the world with a over 4 billion fans around the world. Gail B. Stewart in Soccer describes this by saying, "Soccer is without a doubt the world's game, played by more nations than any sport." One reason that soccer is so popular is because of how easy it is to pick up and start playing, so here are some of the basics.

 Equipment Needed
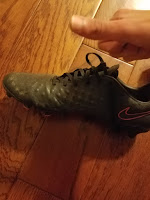
  • Cleats on your feet, metal studs are not allowed.
  • Shin-guards underneath your socks to protect you from getting kicked in the shins.
  • A uniform for your team is obviously necessary.
  • Headgear is optional if you wish to protect your head.
 Basic Rules
  • 11 players at the start of the game on both teams.
  • No touching the ball with your hand unless you are the keeper or are performing a throw-in.
  • The ball is immediately out of play when the ball goes outside one of the four boundary lines.
  • A reckless care of act against the opposing team will result in a foul and a free kick for the other team.
  • You cannot be behind all of the opposing team, you have to be in front of at least one to avoid a offside, giving the opposing team a free kick.
  • To start the game, there will be a kick off where a team will start by passing to a teammate, decided by a coin toss.
  The Basics of the Game 
  • When a ball is rolling towards you, use the inside of your foot as a cushion to trap the ball.
  • When shooting, put your weak foot about a half-foot alongside the ball, then with your strong foot strike the ball with your laces.
  • Keep both your feet on the ground and bring the ball behind your head on a throw-in.
  • To dribble, lightly tap the ball in front of you in a controlled manner.
 If you have any questions or concerns please let me know in the comments.
 Stewart, Gail B. Soccer. Lucent Books, 2001

Forming Focaccia First


The biga once it had fermented in the fridge
While Italy is known as the world leader in fine leather goods, marble, and ancient masterpieces, it is less known as the birthplace of a often overlooked craft, gourmet baked goods. Many recipes for the delicious goods lining the counters of bakeries around the world originated in Italy. I am embarking on a mission to learn about and be able to craft breads and I sweets to astound every customer at a bake sale. In the past, I have enjoyed trying out different bread recipes with varied success; I have had trouble getting dough to rise consistently. However, after reading The Il Fornaio Baking Book, by Franco Galli, I have found new strategies and tips to insure that my dough will rise as well as challenging new recipes. My first challenge was to bake a Focaccia Alla Genovese, a flat bread covered in olive oil that I remember enjoying all along the coast of the Mediterranean Sea.
Galli’s method involves making a biga to leaven the bread. If you have never heard of biga think of well fed yeast. If you paid attention back in fifth grade science, you would remember that yeast is a living organism that produces carbon dioxide. This chemical reaction is used in most bread recipes to produce light and airy bread, but packaged yeast cannot always do the job on its own. The old Italian way of getting bread to rise, biga is a mix of yeast, flour, and water. This mix is set in a cool place and allowed to ferment, activating and feeding the yeast until a baker scoops some up and combines it with other ingredients to create soft, fluffy dough. If a biga acida or sourdough starter is required, the yeast is kept alive and “fed” flour and water until it forms spores that contain the sour flavor. Jars of starter can be kept for years, used again and again and referred to as “mother dough.” One woman claims to have a starter that is 122 years old!  
Kneading the dough.
After my biga had fermented in the fridge for two days, I was ready to start my dough. I gathered my ingredients and brought them up to room temperature before mixing packaged yeast and water to supplement the biga in the dough. I combined all the dry ingredients in a bowl and then carefully added the wet ingredients. Kneading is one of the toughest parts of making bread, working the dough like an elastic band across the countertop and trying to force it into a smooth, well mixed ball.
This accomplished, I placed the dough into an oiled bowl, covered it with a damp washcloth to keep the surface from drying out, and put the bowl aside in a warm space, where it rose for the next hour and a half.
The dough finally ready to bake.
Once the dough had doubled in size, I turned it over and then set it back to rise again for another hour. When it was considerably larger in size, I shaped into a square per Galli’s instructions and then set to rise one more time. Galli recommends baking loaves on stone because “porous unglazed stones gives them a wonderful crisp crust that baking on sheets cannot match”(Galli, 15). I happened to have a pizza stone that I set on the bottom shelf of my oven, which I preheated to 425*F. Gali also recommended misting with water before baking. This was a step that was entirely new to me but I tried it out, trusting the expert.
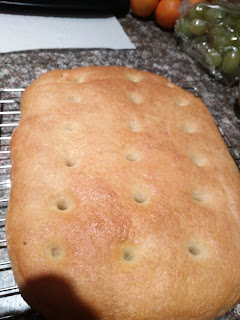
Finally the dough was done rising for the last time. To make the standard dimples in the top of the focaccia, I pressed my finger into the dough before painting the surface with a light coat of olive oil. Carefully I transferred the dough onto the blistering hot pizza stone in the oven. Galli recommended baking the bread for five minutes, misting the oven, and then baking for 30 more minutes. Once the crust looked like a corgi’s rear end, I pulled the bread from the blazing hot oven and set it on wire racks to cool.
The bread cooling after it was done baking. 
Overall I’m happy with the way my bread turned out -- especially for my first try. Not only is it edible, but I got some compliments when I shared it with my family. If I had a chance to try this recipe again, I would paint it with a little more oil and mist it less often, hoping to make the crust turn out a little softer.


What delicious Italian recipe should I bake next? Calzones, Braided bread, or Sponge Cake? Let me know in the comments what you recommend.

Beauty 101: Skincare


The most important part of beauty and makeup is to make sure that the products you are using are good for your skin. The way we can correct this is through skincare. I personally have problematic skin but through guidance, it has become better. The first step to skin care is knowing your skin type. In Bobbi Brown's book, Bobbi Brown Makeup Manual, She explains a self-analysis of how to recognize your skin type. Brown says "An accurate skin analysis will help you determine the most effective cleansing, hydration and makeup products for your skin type and condition. However, when problem skin shows no improvement, see a dermatologist." (Brown, 32). 


I determined, through this analysis that I have combination skin. As you can see, I have oiliness on my forehead, nose and chin (T-zone), also where I have my breakouts and larger pores and dry patches on my cheeks where it feels tighter. Brown says that a gel cleanser and a moisturizer containing alpha hydroxy acids is most beneficial to combination skin types (Brown, 33). After reading, I realized that my skincare routine does not follow these guidelines that are beneficial to me so I decided to start fresh with a new routine.

Before
After
The Mario Badescu Enzyme Cleansing Gel, DIY apple cider vinegar toner and First Aid Beauty Ultra Repair Cream Intense Hydration Cream (pictured top right) now make up my skincare routine and this is the best my skin has looked in months. As you can see, following this advice has cleared up my skin a little bit in the past couple weeks


What skin type do you have and what are your favorite products?

Resource: Brown, Bobbi, et al. Bobbi Brown Makeup Manual: for Everyone from Beginner to Pro. Springboard Press, 2011.

Simple Origami Cup

Simple Origami for Beginners - Cup

Have you ever wanted to learn origami but never had the time to? Or just thought it was fascinating how a simple piece of paper could be transformed into magnificent objects?

Well that was me. And now I am finally able to what I have been interested in for years. Origami is the ancient art of paper folding. It has been around for centuries and over time they have gotten more and more complex. There are infinite possibilities to what a folded piece of paper can become.

There are many essential things when it comes to origami. From the book, Fun With Origami, by Harry C. Helfman, "Having sharp creases and folds are essential to origami. For a sharp crease will fall into place more easily" (Helfman 3). And that is 100% true. This crucial piece of information may seem obvious but there are types of circular lanterns that seem like they do not contain any folds. However, every piece of origami must have creases and folds. At first I tried to challenge this fact by trying to make an origami cup without folds. I did not get through the second step because it needed many sides to stay on top of each other, which is where folds are needed.

Since I haven't done origami for years, I decided to pursue one of the easiest origami objects. And that object is the cup. Luckily for me this text contains many objects for different skill levels. This book also goes from the easiest to hardest origami. It says, "Beginners will be able to master such simple shapes as a sail boat, jet plane and paper cup. Intermediate-level paper folders may find the bird, whale, fish and more..." (Helfman 3). Having the book written this way from beginner to intermediate to expert allows people to start out easy and work their way up. It also boosts selfconfidence by starting off easy. It also allows people to grow their skills steadily and not be overwhelmed by the difficulty. Having levels of origami that goes in order really boosts my self-confidence because the first origami object took little to no time. It has also allowed my passion for origami to grow and now I am interested in making different objects and animals.

My personal favorite origami is the crane because it is a classic and it works well for decorations.

Have you ever done origami? Which is your favorite thing to make and why?

Below are 5 simple steps to make your own origami cup.

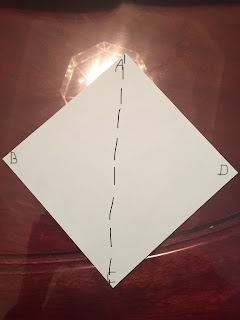
Step 1
Fold origami paper in half 
Step 2
Corner B should now rest on corner D


Step 3
Place so folded side is nearest you.
Bring corners A and C to the white circles

Step 4
Fold first flap over line F-E.
Turn shape over and fold 
second flap over line F-E. 
Be sure to crease both folds. 


Step 5
Open cup by pushing both pointy sides inward.
Finish
Overall, this origami cup was very fun to make. The steps were very simple and easy to make. The origami cup is one of the simplest origami designs. I hope you guys will give this origami design a try. After completing this origami cup, I am more eager to learn how to make new origami.


Helfman, Harry Carmozin. Fun with Origami: Easy-to-Do Projects and 24 Sheets of Origami Paper. Dover, 1991.

Wednesday, November 29, 2017

Christmas Cards


I enjoy making different kinds of crafts and projects. With the holidays coming around, what better craft than Christmas cards? "Spread the cheer this year with seasonal salutations you make yourself" (Wasinger, 99). Making things by hand allows you to not only express your creativity, but it is also a good opportunity for you to give someone a meaningful item that you put time and thought into. The book, Artful Christmas: 30 Elegant Craft Projects, contained many craft ideas that helped me add more joy to the holidays.

This project focused on using different patterned and card stock paper, as well as scissors, glue, and other supplies, to create cards with various Christmas tree designs. The main goal was to snip little strips of paper and glue them in differing patterns to create unique trees. The book contained several ideas for the card design, including a vertical and horizontal Christmas tree. 

For the vertical tree, I was supposed to "cut all of the paper strips to the same length to fit the height of [the] card" (Wasinger, 101). Then, I had to glue them to create the outer edges of the tree and work my way to the center. I attempted to place the strips evenly and glue them as proportionately as I could, but the end product did not look as good as I would have liked. 


However, with more practice and patience, I was able to create a slightly better card. I continued using the book's instructions and suggestions, but instead of cutting my own paper strips, I used different patterns of tape. This way, I could make sure that each strip was exactly the same width, so the tree would definitely be more even.


For the horizontal tree, the book suggested cutting eight or nine strips of patterned paper in varying widths and slightly varying lengths and placing them from the bottom up, one strip at a time (Wasinger, 101). I tried this method and it worked well enough, although the book didn't specify exactly how big the strips should be. But, this was a good start and I improved in the next few cards I made, both with the card's appearance and in my efficiency in making them.


In my opinion, the vertical Christmas tree was harder than the horizontal one because the book was not as specific in describing the lengths of the strips and the position in which I should glue them. Also, I was able to use more patterns of paper in the horizontal tree, while I was limited to only a few patterns in the vertical tree, because the number of strips I could use in each one depended on the height or width of the paper.

All in all, through a simple, creative, and fun craft idea, I was able to create various Christmas card designs that not only were enjoyable to make, but also will spread holiday cheer and show the people who receive these cards how much time and effort I put into them and how much I care about them.

Would you be willing to use these methods to make your own Christmas cards? Which Christmas tree design was better, the vertical tree or the horizontal tree?


Wasinger, Susan. Artful Christmas: 30 Elegant Craft Projects. Lark, 2014.

It's All About the Dirt

Evergreen Tree sprout planted in rich potting soil
with leaves and wood chips.
From the book Urban Gardening for Dummies, it's said that "The soil is the heart of your garden," and that is 100% true.
The soil you use to plant with is essential to the plant's success and many factors play into it. Urban Gardening for Dummies suggests tilling or turning over the soil frequently because it allows oxygen to interact with the soil and cause the soil microbes too, "go wild for organic matter" (Association)
Kent isn't exactly a farm town so, where do you get this good soil? Of course, you can always go to your local Home Depot and purchase a bag of potting soil, or you can try something cheaper and closer to home. Leaves, grass clippings, pine needles (these are highly acidic though so be careful), wood chips, and hay or straw are the most common plant-based organic matter used for garden soil (Association). These items are generally easy to find from mowing the lawn, collecting fallen leaves, and straw is pretty cheap. For my soil (seen on the right) I mixed leaves, wood chips, and some store-bought potting soil together.
Did you know that dirt played such a big part in our ecosystem?


Association, National Gardening., et al. Urban Gardening For Dummies. John Wiley & Sons, 2013.

Monday, November 27, 2017

Dog Training - Target

Geller, Tamar, and Jonathan Grotenstein. 30 Days to a Well-Mannered Dog: the Loved Dog Method. Gallery Books, 2011.
11/27/17
When I first got my dog, Marcy, she was untrained and only understood the commands, "sit", and "down." Having had her for more than 8 years now, I thought it would be wise to start teaching her more than the basic commands.  

"Teaching your dog how to touch a target with his paw or nose isn't only a cool trick, it's a building block that will help you to teach your dog all kinds of more complicated behaviors." (Geller 263)  The next step up from "sit" would be this simple drill. The simplest form of this task would be placing a treat on the palm of your hand, saying "target", then when your dog has touched your hand with his/her nose or paw, reward them with the treat. Changing levels of difficulty, such as moving your hand to different positions, will allow this drill to be the most effective. 


When trying this drill for the first time, my dog only jumped up and down in excitement and never understood when I said "target." 

"Rub a treat on your palm and hold it out to your dog." (Geller 263)
I tried this, instead of just holding the treat on my hand. I made sure that Marcy knew that the treat on my hand was the target, and not just something to eat. After several "target"s were said and many dramatic gestures were made, she finally started to get the hang of it. I started moving my hand to a higher position, then lower, then side to side. After being able to locate the target 10 times, I decided to move on to the next level. 

"Once he's learned to target your hand, you can switch to objects. Choose an area that doesn't have too many distractions, like a room with a lot of open space or your backyard. Your 'target' can be just about anything - a traffic cone, a stick on the ground, or a Post-it stuck to a chair." (Geller 263) 

I place a treat on a pillow and hold Marcy about 6 feet away from it. I point her in the direction of the treat, say "target!" then release her. For the first few attempts, she doesn't see the treat and runs in a frenzy trying to find it. Then, I pick her up and make sure she sees where I put the treat and repeatedly say "target," pointing at it. After a few more tries, she runs over to the pillow, eating the treat. 
"Don't move on to the next step just because your dog has done something right once or twice." (Geller 268) Before moving on to new and more challenging targets, I had to repeat the same target until Marcy was able to locate it several times. After a few mistakes, but an overall target achievement of 6 times, I moved the treat to places like the couch, the ottoman, and on a post-it note on the floor. 

Overall, this drill has improved Marcy's ability to understand a new command, locate objects, and identify goals. 

If you own any of sort of pet, what do you think would be the most difficult thing to teach them? Why would that task be difficult? Why do you think some dogs are fast learners while others are not?