Showing posts with label Rodas. Show all posts

Saturday, January 27, 2018

Creating my own characters Stage 5 - Color scheme

Creating My Own Characters Stage 5- Color Scheme 

Stage 5 is the last stage in creating my characters. In stage one I developed their personality's and body structures, stage 2 was facial structures, stage 3 combining the body with the face and stage 4 was the outfit/costume design. In stage 5 i will be talking about how you can use the color scheme to enhance your characters personality and give them a little more of a lively look. Because my characters have different outfits I will be talking about the edgy side and and elegant side of the color scheme. 

Vicky

Vicky's outfit was created in stage 4 and it was based on a Laura croft design that I saw, I used the Laura Croft photo as my inspiration for both the outfit and the color scheme.  Due to the fact that her outfit is a lot edger than Eric's and plays with her sarcastic character, most of it is black or a dull gray. Her pants are the largest part of her outfit and I kept them black with the rings around her knee and thigh white to draw more attention to those areas. "Make the large part of the outfit a duller color to draw attention to the details" (Brooks 72). There are a few pops of color in her outfit like the red lipstick, the blue case she has strapped around her left thigh and the vibrant purple long combat boots. I gave her a dark pecan colored brown hair color and to match her hair a coffee eye color, both of these colors pop out on her caramel skin tone. Another detail I added was the black streaks in her hair to show hoe here hair is parted and or styled. The colors work together because they are a lot of dark warm tones with pops of cool tone when working with a edger outfit.


Eric 


For Eric's costume, because it is a lot more elegant and classier I didn't add as many details that would pop with color because i wanted the main focus to be on the suit itself rather than the details. To show that there are details without a difference of colors I just changed my shading, the fold and creased parts of his suit are a lot darker than the parts that are just flat material. Tip: outlining is the most important part if you want something to stand out. I outlined Eric;s suit because I wanted to show how it hugged it figure and gave him a little more dimension than before. The shirt under the tie and the suit is a crisp white because it give the outfit a more refined and classier look making Eric looking more professional. "The key to a men's outfit is the subtle mix of darker colors than bright colors" (Brooks 76).  His  dark brown shoes and the while buttons on his vest play as those little subtle details and wrap the outfit.


That was it for color scheme and I hoped you enjoyed coming along with me as I created and developed Eric and Vicky. :)


How did you characters come out? Did you enjoy this blog?


Brooks, Josiah. Draw with Jazza - Creating Characters: Fun and Easy Guide to Drawing Cartoons and Comics. Impact, 2016. 


Saturday, January 20, 2018

Creating My Own Characters: Stage 4 -Outfit Design

Creating My Own Characters: Stage 4 - Outfit Design 

In this stage I will be showing you have to design an outfit that is suitable for your character and their personality. "Your characters costume is a vital part of the characters design and personality" (Brooks 63). Like how our clothes show a little bit of our personality and how we express ourselves, its the same with your character. I'll be using my characters Vicky and Eric as examples.

Vicky 

For Vicky, I decided to do a little Laura Croft outfit because shes a spy, her personality is a lot of sarcastic snarkiness that really fits her spy outfit. Her outfit comprises of a skin tight body suit with long combat boots and a few straps around her thighs that would secure anything like a wallet. She also has a a shorter hair cut that works will with her bad ass look, there is a belt around her waist to show off her figure and give her a feminine look. The little touches like pockets and high turtle neck shirt with laces around the neck add a little detail that draws the eyes to it and grabs someones attention.  Tip: When designing your characters costume its also very important to try to match your characters personality and their story line.
Eric 

Eric is the second half of my spy duo, he is a similar to Vicky personality wise but at the same time he is very different. I show this difference with their costumes, Vicky's costume is a lot more edger while Eric's is class and work like. I placed Eric in a suit because when I think about a bad boy spy I think about the old James Bond movies with James Bond wearing those classy black suits with the fancy bow tie."Using movies and photos as inspration is not bad, it gives you more to work off of" (Brooks 67). I went a little different with the suit design, I left the bow tie behind and added a vest and tie to the mix. Eric's piercing and scars give the suit a little bit of an interesting mix, the little details on the slack pants and the hand in the pocket gives Eric's a lot of attitude and makes him look a lot more confident. Also just realizing that the attitude behind Eric and Vicky's name are different. Vicky sounds a lot more spunky and sassy while Eric is a lot more elegant and classy.


How would you dress your character? What are the inspirations for your costume?


Brooks, Josiah. Draw with Jazza - Creating Characters: Fun and Easy Guide to Drawing Cartoons and Comics. Impact, 2016. 

Saturday, January 13, 2018

Creating my own characters Stage 3 Body and Face combined

Creating my Own Characters: Stage 3 Body and Face Combined

This is my 3rd blog post about the creation of my own characters.  In stage one and two I introduced the special spy duo Vicky and Eric. Stage one was the development of their personalities and qualities while stage two was about creating their face structures based on what we know about them. In stage three its about combing the face and body to create our fully developed characters, including the overall proportions of the body. there are a lot of difference between the proportions and structure of my characters and it took a while to get them just right.

Vicky

When sketching out Vicky's body proportions i started out with the head shape(go to stage 2 for more details), her torso would be the length of two heads and then draw a line there. Hips to pelvic area are another head length, draw another line. Form Pelvic and to knees is another head length and same for legs to feet. Overall her body is 4 heads long, not including her neck which should be half her neck and as long as you think is good. From her neck go straight down to her shoulders who should be about the width of her head but 0.5 cm longer on each side. Leaving the shoulders as they are and move on to the torso, making the chest area curved go straight down and make a curve where you desire the hips to be, from there go out and continue moving out to the the outer pelvic area making it into a curved point. Going back to the arms and shoulders, draw circles on either side of the on the same line as the hips for the elbows and a little bit below the pelvic area. Connect the each side of the circles to the shoulders to create the arms. "Don't make the whole arm the same width, starting form the shoulders make the arm a thicker and slowly decrease it whist going downward" (Brooks 53). The wrist should be the thinnest part of the arm. Go back to the pelvic area and start on the legs,draw two circles where you drew that line for her knees. The thighs can be as thick or thin as you like, but the  outer section should curve into the knees no matter what. Tip: The shins and shouldn't be straight lines curve them out a bit from the knee to show calf's but thin them when heading for the ankle. Hands and feet are not really important at this step, they will be talked about more ins stage 4 and 5. After the sketch of the body is done you can go back to the face and copy what you did in stage 2. After you are satisfied with the drawing you can erase all the circles and put in marks to signify where the elbows and knees are.


Eric

Eric's sketch is a lot similar to Vicky's without all the curves. Again start with the same head shape from stage 2,from there make the neck a little thicker than Vicky's because men tend to have thicker necks then women and make it as long as you want.  Do the same head length proportion lines to decide where the torso, legs, and knees would go. Eric is about 5 heads tall. The shoulders should be a lot broader than the females so you can draw lines a few cm away from his head down to where his shoulders should start. Draw lines from the neck and downward in a slightly slanted angle and stop when you hit the lines. From there stop and move down to the torso, "the male torso is a lot straighter than a female torso" (Brooks 53). Curve the chest a bit inward and then you can basically go straight down from there to the pelvic region. Go back up to the arms and follow what you did with the circles in the female figure drawing, but make the base of the arms a little wider to show that the character has muscles. Tip: Male Wrists are a lot wider than females so don't make it the same size as the females characters. I made Eric's wrists twice as larger as Vicky's if that helps.  Moving down to the leg region follow the same basic skills you used of  Vicky except a males legs don't curve in as much towards the knees as a females. Calf's and knees should be larger, depending on the height of your character. After your done with the body head up to the face and copy the face that you created in stage 2 for your character. Once done with the overall produce yo cna erase all the guidelines an circles to make your drawing look more professional.


That was it for Step 3, come back for step 4: Designing clothes for your Characters. 

Was it easier to draw your female or male character? What part was the easiest and what part was the hardest? 

Brooks, Josiah. Draw with Jazza - Creating Characters: Fun and Easy Guide to Drawing Cartoons and Comics. Impact, 2016. 


Sunday, December 31, 2017

Creating my own characters: Stage Two Face Structures

Creating my own characters: Stage Two 

Face Structures

In stage one I introduced my characters Vicky and Eric and developed their personalities as well as stated their relationship. Here is my second blog post about the process of creating my cartoon characters, in this stage is will explore the possible face structures of my characters and their personalities. Since one of my characters is female and the other is male there will be distinct differences in face structure, so I focused on them separately rather than together.

Eric

When developing Eric's face structure I kept in mind that he was  a male with an edgy personality on the outside but a big softy on the inside. Its important to develop a familiarity with the more 'common proportions' of the skull/head. (Brooks 34) When drawing him I keep a rough sharp edges for his eyes and his jawline as well as his eyebrows.  His jawline was extended to a sharp point while his cheekbones were less defined. I kept his cheekbones the same while softening up his jawline but kept his eyes angled and sharp, in a somewhat anger mood. This could be interpreted as him being angry at the world or his teenage angst. For Eric's hair I kept it it short and choppy with a little hair hanging like Johnny Depp's character in the movie Cry Baby. Just for fun I added a few piercing and scars to give him an overall bad boy look.


Vicky 

Personally I found that drawing female faces are a lot easier than drawing males.  her faces shape is an oval round face with freckles. The main feature that I wanted to show through Vicky was her large doe like eye, on her long faces, her eyes give her the appearance of innocents that will work to her advantage as a spy later on in her story. Her small petite nose and mouth work also as a character contrast to Eric who has a larger nose and mouth and an also larger personality. Vicky's are her only angled feature, unlike Eric's eyebrows she has a sharp point at the end. Her hair works as a way to frame her face give her a small appearance, her whole appearance is an opposite to her personality that is sassy and sarcastic, the dangle earring plays as small symbol of her personality.

Tips: "Shading and angled features make the development of the character more noticeable." (Brooks 32)

What would your characters faces look like? Would their personality match their faces?
Brooks, Josiah. Draw with Jazza - Creating Characters: Fun and Easy Guide to Drawing Cartoons and Comics. Impact, 2016. 
Thursday, November 30, 2017

Creating my own Characters Stage 1 :)

Creating my own Characters: Stage 1 Discovery

As a little kid I was obsessed with cartoons. Whether it was Scooby Doo or Spondgebob I was always fascinated by the colorfully creative worlds these characters lived in, I wondered how they came to be and who was behind these mischievous characters. As I grew up I learned about animation and bringing these characters to life on a TV screen, but it all began with a doodle from a imaginative cartoonists on a sheet of paper. While reading the book Draw with Jazza, Creating characters I remembered my love of cartoon characters the book has helped me lay out step by step how to create my characters and how to develop them.

Brainstorming my characters:
When brainstorming a character you have to go through a character breakdown process. Be clear on creating key aspects of the character both physical and nonphysical, "the characters personality will help you develop their physical attributes"(Brooks 5). Start with Personality and Motives. My characters are Vicky and Eric two teenagers a guy and girl, both are secret spies for the US government. Vicky is snarky, sarcastic with a lot of sass, and pretends to hate everyone but once you get to know her shes the softest person. Eric is the schools bad boy, he skips class, spray paints vulgar words on the side of the school building and is all around a intimating guy. Together they create the best spy group in the US, although they argue and insult each other a lot they make good friends.

Basic Body Construction
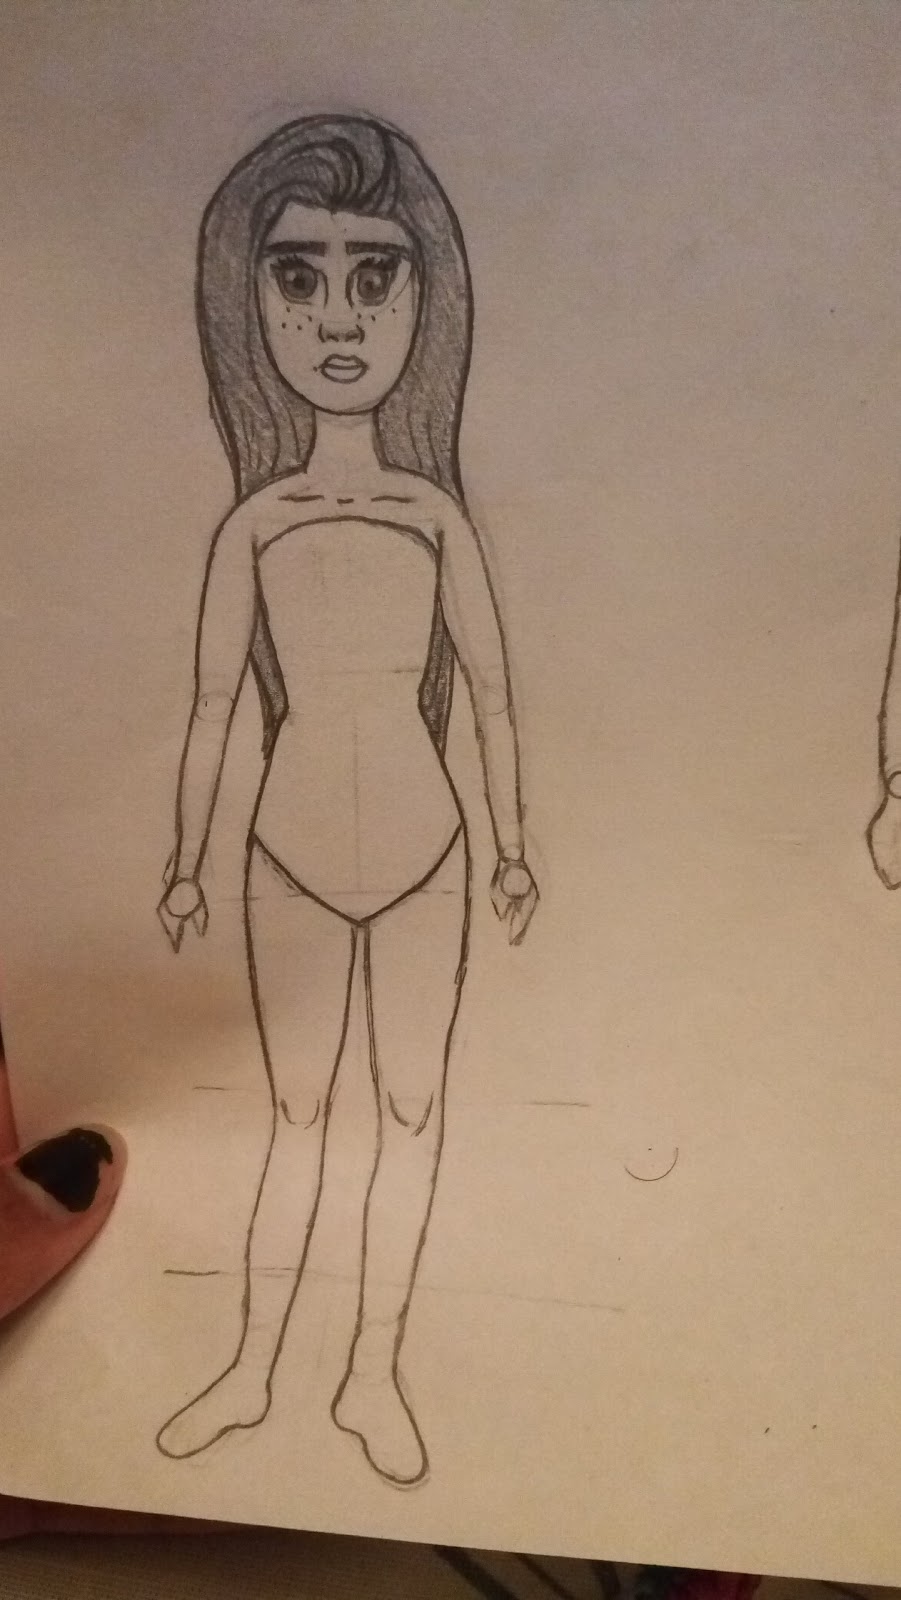
After I have envisioned my characters and i know their personalities really well I begin to sketch the physical attributes of my characters. Vicky and Eric are in their senior year of High School so they are moving on from the awkward teen stage and becoming adults and their bodies need to show that. I began to sketch Vicky, I covered all the joints, head shape, hips, and overall figure of a girl. Her curvy figure will enhance her sassy attitude and sarcastic comments For Eric I focused on a slim rather than muscular figure, height and body shaped was more important. He couldn't be really muscular because he needed to be agile and cat like to be a spy but still toned. Eric is going to be a lot taller than Vicky to strengthen their differences.


Body Structure for Vicky


While drawing a females body structure I recommend remembering that "most women have curves and that their body shape is a lot more delicate than males"(Brooks 23). Also remember that females tend to have wider hips than males.


Basic Body Sketch for Eric 

For Eric I made his body a boxed shape rather than a curve like Vicky. Remember to use more angled shapes for a male character.  In my opinion its easier to draw Eric's body because of the lack of curves.
 
Have you ever wanted to Create Cartoons? What Personalities would you give your characters? What Physical features? 

Brooks, Josiah. Draw with Jazza - Creating Characters: Fun and Easy Guide to Drawing Cartoons and Comics. Impact, 2016.