Showing posts with label Mulugeta. Show all posts

Wednesday, January 17, 2018

Learning Origami: Pecking Crow

Learning Origami: Pecking Crow


The sun is officially starting to come out, which means that the crows are beginning to come back to rainy Seattle. For my last blog post, I will be showing you how to make an origami pecking crow! Since the weather is beginning to improve you will be seeing many crows in the Seattle sky, Today, thanks to the book, Practical Origami: A step-by-step guide to the ancient art of paper folding I can show you  simple steps to making your own origami paper crow model.

This origami crow model, created by Makoto Yamaguchi is very unique because the folds are made through two layers of paper, so when layers are separated, the folds are kept in place. This model is also unique because the crows beak can open. To open the beak, all you have to do is extend the wings outwards to open, and inwards to close. The book states, "To make the beak open you pull  the wings slightly apart" (Beech 127).  For this action model, the only material you will need is a square piece of paper.

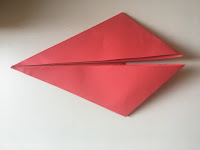
The most troublesome part of making this origami piece was step four. The wording of this step was very difficult to understand, however the picture included in the step made it easier to understand. After looking at the picture, I was able to summarize the step into opening the section of paper at the top and pull the single layer, flatten the model. In the book, Step four stated, "Open the section of paper at the top slightly, and you will observe one layer inside the other. Pull out the single upper layer, separating it from the outer layer wrapped around it" (Beech 127).

Below are Eight steps to creating a paper Pecking Crow:
Step One: Fold the paper in half diagonally. 
Then fold into quarters, unfold.
Step Two: Fold the two edges to lie along the 
vertical crease created in step one. 

Step Three: Fold each of the
 pointed flaps outwards.
Step Four: Open Section of paper at the top and 
pull single layer, flatten the model.


Step Five: Fold the upper corner 
all the way down.
Step Six: Fold point created in 
step five to the right, unfold and repeat
 to the left side.

Step Seven: Unfold crease made in step six, 
pull and squeeze model together at the point.

Step Eight: Turn model over and repeat 
steps 5-7 on the other side.


Overall,  this was a very entertaining and rewarding origami piece to make. This action model was very interesting and overall, I believe that my origami skills have improved tremendously since I began creating blogs. Thanks to the book, Practical Origami: A step-by-step guide to the ancient art of paper folding, I have a newfound interest in origami and will continue to make origami pieces. There is so much more to origami than just paper folding, origami can be used as a stress reliever or even just for pure entertainment, I learned  so much from this book, and cannot wait to continue learning more! For the final time, thank you so much for reading my blog, and I hope that the "Learning Origami" blog series, and the steps I summarized from the book made it easier to make an Origami pecking crow! Although this is my final blog, I hope that your knowledge from reading my posts has increased your interest in origami as much as making these blog posts has increased my appreciation for this art.

What is your favorite origami piece I have completed in this "Learning Origami" series? What did you learn from this blog?


Beech, Rick. Practical Origami: a Step-by-Step Guide to the Ancient Art of Paperfolding. Hermes House, 2006.

Sunday, January 7, 2018

Learning Origami: Paper Cup

Learning Origami: Paper Cup


Making arts and crafts, is something I am always willing to do, and something I am always eager to complete. For today's blog post, I decided to make something more logical, that I am able to use regularly. Thanks to the book, Practical Origami: A step-by-step guide to the ancient art of paper folding, I can show you how to make an origami cup. This origami model is a very popular design, that is also very simple to make!  For those who are like me, and are not artistically talented, this origami model is something that can be taught to all skill levels, as said in the book, "This is, perhaps, the simplest model to make, and is easy to  teach to "students" of  all ages" (Beech 47). This is a very enjoyable model to make, that you can complete along with your younger siblings or other family members.

This origami cup, allows you to even drink out of it. The book states, "If you intend to drink from the cup, be sure to use material which is glossy, like a foil-backed giftwrap" (Beech 47).  I am so excited to show you how to make this traditional, as well as very logical origami design. With only seven, easy to follow directions to creating this model, I am able to use these cups whenever I want. After completing this origami design, I personally would recommend using gift wrapping tissue paper the for the first few times, so you are able to perfect the creases and folds.

The most difficult step in creating this design, was the second step which was folding down the single layer of paper down to lie on a folded crease created in an earlier step. "Fold the upper raw edge down to lie along the folded edge created in step " (Beech 47). Completing the actual step wasn't that difficult, however the wording of the direction was what confused me. The inclusion of a photo, in this step, made it much easier to comprehend.

Below are Seven steps to creating a Paper Cup:
Step One: Fold paper diagonally in half.
 Step Two: Fold single layer down to lie on
horizontal crease created in step one.
Step Three:  Unfold crease created in step two.


Step Four: Fold right-handed corner 
to where the tip meets with the 
crease end made in step two.

Step Five: Repeat step four on the left side, 
remember to align model symmetrically.
 Step Six: Fold single layer of the upper corner down
over the flaps created in steps 4 and 5.
Step Seven: Repeat step 6 on reverse side. 
Open model along edges created through steps 1-6.


Overall, this was a very fun and straightforward model to create. I enjoyed creating this origami paper cup, and was surprised with how simple it was to complete. I made this model with my younger sister, and bonded with her while competing the steps together. There are multiple uses to this origami model, and I personally use it as a jewelry holder in my room. My skill level in creating origami crafts has grown, and my knowledge on this art has increased as well.  I am so eager to continue learning more from the book, Practical Origami: A step-by-step guide to the ancient art of paperfolding. My favorite art craft to complete with my family is making paper snowflakes. Thank you so much for reading this blog, and hopefully you gained knowledge from this post!

What is your favorite art craft to complete with your family?


Beech, Rick. Practical Origami: a Step-by-Step Guide to the Ancient Art of Paperfolding. Hermes House, 2006.

Monday, January 1, 2018

Learning Origami: Fortune Teller

Learning Origami: Fortune Teller


2017 is officially over, with the new year beginning, release everything from the past and be ready to celebrate 2018. There is no way to determine the future, however, a fortune teller can release your worries for the upcoming year! Today I will be showing you how to create your own origami fortune teller, and have some fun with the idea of knowing what will be coming this year. Fortune tellers, also known as “cootie catchers” have been passed down through centuries and is usually performed by children. Thanks to the book, Practical Origami: A step-by-step guide to the ancient art of paper folding, I can show you how to make an origami fortune teller. This origami design is very well known and popular, the book states, “This has to be the one model that virtually everyone remembers making as a child at school” (Beech 175). I never knew how to make my own fortune teller, so for those like me, below are six simple steps to creating your own fortune teller.

The first step to creating an origami fortune teller was to fold the paper into fourths, unfold the paper, fold the four corners into the middle evenly, then to repeat again on the other side. “Blintz fold the corners of a square. Turn the paper over and Blintz fold again” (Beech 175). Although the wording of this step was confusing, this instruction was easy to accomplish thanks to the inclusion of a photo in this step.

Below are Six Steps to creating an origami Fortune Teller:

Step One: Fold paper into fourths, unfold paper,
fold corners towards center evenly. Repeat on reverse side.
 
Step Two: Fold model in half, horizontally.


Step Four: Open the slits created in step one.

Step Three: Push corners towards center.

Step Five: Place fingers into the four slits made 
in step four, to create creases.

Step Six: Label Flaps with colors, numbers,
 and objects.


To conclude, making an origami fortune teller was very easy and fun.  After completing the steps, label the folds of the design so you can use the model effectively. The book states, “Write four different colors on the inside, and underneath each panel write a fortune” (Beech 175). Practical Origami: A step-by-step guide to the ancient art of paper folding allowed me to make a craft that I always played with when I was younger. I look forward to showing my younger sister how to make this on her own, and play with her! The fortune teller is one of my favorite art crafts that I played with when I was younger. I hope you enjoyed this blog post, and hopefully you will try out making your own origami fortune teller. Thanks for reading!

What was your favorite craft to play with & make growing up?


Beech, Rick. Practical Origami: a Step-by-Step Guide to the Ancient Art of Paperfolding. Hermes House, 2006.


Tuesday, December 26, 2017


Learning Origami: Christmas Stocking 

With the holiday season in full swing, what better way to celebrate than my creating your own Christmas decorations! For this blog post, I will be making Christmas stocking origami, Christmas stockings are a crucial part to celebrating Christmas in my home, and are hung every year above my fireplace. Thanks to Practical Origami: A step-by-step guide to the ancient art of paper folding, I can follow simple steps to create mini-stockings that I am able to decorate with all throughout this holiday season.

In order to make the Christmas stocking, the materials necessary included one square piece of paper with a different-colored reverse side. The book stated that, "This traditional model was originally a napkin fold, but has been adapted here to be made from conventional paper" (Beech, 210). After completing this origami design, I personally would recommend using gift wrapping tissue paper as opposed to construction paper, due to construction paper being more difficult to crease and fold. 

 The first step to creating a stocking is, "With the color you wish to be predominant in the design on top, fold up a narrow strip at the lower edge" (Beech, 210). As I followed the instructions of the book, I noticed that a thinner border at the bottom of the paper, looked more appealing than a thicker border. This is because, a thinner border gave a more distinct look to the stocking.

The most challenging part of creating this origami design was creasing and creating folds in the paper. This is because, I decided to use construction paper, instead of tissue paper, which would be ideal to making a perfect and precise, origami Christmas stocking.


Below are 10 simple steps to creating a Christmas stocking:


Step One: With the side you wish to 
be predominant, 
fold a strip at the lower piece of the paper.
Step Two: Flip the paper over horizontally,
and fold in half.


Step Four: Fold the left-handed
corners towards the center.
Step Three: Turn paper 90 degrees
anticlockwise, and fold the sides to be
aligned with the center crease.
    Step Six: Fold newer edge across
           to right-handed edge.
Step Five: Fold left-hand corner across
to inner edges from Step Four.


Step Eight: Turn stocking around, 
    so that narrow piece is on top. 
      Fold model in half, vertically.
Step Seven: Fold upper layer back, 
across to the left.

Step Nine: Swing "toe" of stocking, 
outwards and forwards.


Step Ten: Lock model by opening model, 
lifting border by tucking upper 
corner and folding stocking, 
creating a pocket.


All in all, making these origami Christmas stockings was very informative and entertaining. After making a few Christmas stockings, I feel as if my knowledge as well as my skill-level in completing origami crafts has grown. I will definitely be decorating my house with these Christmas stockings throughout this holiday season! I believe that my knowledge has increased on the skill of making origami, and I am eager to learn more from the book, Practical Origami: A step-by-step guide to the ancient art of paperfolding. I make many of my Christmas ornaments, and my favorite thing about the holidays is spending time with family.  Happy Holidays and Merry Christmas!

Do you make any homemade Christmas decorations?  What is your favorite thing about the holidays?


Beech, Rick. Practical Origami: a Step-by-Step Guide to the Ancient Art of Paperfolding. Hermes House, 2006.

Friday, December 1, 2017

Learning Origami:Paper Crane


Learning Origami: Paper Crane

I've always enjoyed creating arts and crafts, and have been always fantasized with how you could create so many complex shapes and objects with just a simple piece of paper.  Origami has been around for centuries, and originated in Japan. The word "origami" originated from the Japanese language, where "ori" means folded, and "kami" means paper.

Not only is origami an art of enjoyment, and symbolizes peace, it also has been a valuable source of brain stimulation. ".. For over 2,000 years origami has been a source of interest, enjoyment and intellectual stimulation for adults and children alike” (Beech, 9). With help from the book, Practical Origami: A step-by-step guide to the ancient art of paper-folding, I will be able to pursue an art I have an interest in, stimulate my brain and hopefully increase my skill level in the art of origami.

As I continue to post more blogs, the origami designs I complete will become more and more advanced, to show how much my skill level has improved. Today, I will be showing you how to make a traditional design- the crane. In Japanese culture, the crane is a symbol of peace and friendship, bright and smooth, square-shaped paper is ideal to create the perfect crane.

The first step to creating a crane was to “Begin by folding a Bird base. The two independent points should be facing toward you” (Beech, 46). In my opinion, I wished that the first step wasn’t so complex, and hadn’t required me to flip to page 42, where there were 6 steps to complete the Bird base alone.


Below are 6 steps to creating a classic crane:


Step One: Fold a Bird base.

Step Three: Repeat step two
on the other side.
Step Two: Fold the two outer edges inward 
ONLY on the upper level.
Step Four: "Inside reverse fold both
or the sharp points"(Beech, 46).
  
       Step Five: Inside reverse and fold the
           tip of one side to form the crane head.

Step Six: Carefully pull out the
wings from the side of the crane

To conclude, creating a paper crane was a success! After overcoming the struggle of creating the bird base, the steps listed were fairly easy to follow. I feel as if I have gained knowledge from the book, and cannot wait to continue expanding my skill on making origami! I will definitely  be displaying this paper crane in my room, my favorite design of origami to create is the tulip! 


Would you be interested in creating origami and displaying your masterpieces as decorations around your home? If you have completed origami before, what is your favorite design to create?


Beech, Rick. Practical Origami: a Step-by-Step Guide to the Ancient Art of Paperfolding. Hermes House, 2006.