Showing posts with label Portrait. Show all posts

Thursday, January 11, 2018

Adding Age to a Portrait

                                                          By Lauren Davis
 
Opposite of my last post, an equally difficult task is portraying realistic age in portrait the delicate balance of highlight and shadows is crucial when creating believable wrinkles and contours. Author Jack Hamm recommends keeping in mind a number of things including the ear length, drooping eyelids, and lines in the forehead. (Hamm 38)  I decided to draw this one based off of a photo due to my lack of experience in the technique. In honor of the new season, I based mine off of a photo of Peter Capaldi, the 12th doctor on BBC's Doctor Who. This is my drawing.


The Example Photo


  Step 1- The Outline and Winkle Lines


The outline of a person changes a deceptively large amount with age. Hamm said "The flesh drops at the jowls and the chin bone protrudes."(Hamm, 38) I started by outlining the face keeping these facts in mind. Afterwards I drew up the shape of the hair and drew the contours for all the wrinkles. It is important to keep the anatomy correct wile doing this. Hamm recommends focusing on sinking the eyes, thinning the lips and adding lifework to the forehead.(Hamm 38) It is okay to make the lines darken then usual guide lines because you will need to add highlights surrounding them.


                                  Step 2-  The Shading and Highlights


The most difficult part of shading wrinkles
for me is preserving the desired skin tone.
I happened to choose a pale British man for my model, so it is important to add light between the shadows. I blended out the wrinkles with my finger and then erased the pencil marking on both sides of them. Afterwards, I lightly added in the darker parts of the face with a duller pencil. Notice along with the face, the neck has different shading then other pictures. Hamm reminds an artist, "The neck becomes gaunt making the skin hang in drapes." (Hamm, 39) I tried to incorporate this into the picture. 


                                 Step 3- The Hair and Finishing Touches

                                    
I happened to choose one of only pictures of this actor where he didn't have messy hair. I tried to incorporate the contours of his light grey hair in the drawing. Wile the author reminds that the hair usually thins with age, Peter Capaldi doesn't seem to have this problem. (Hamm, 38) After I got the hair to a good place, I added depth to the eyes, shadows to the hair and color to the outfit. Then the piece was complete.


Final Thoughts

Overall, I like the way this came out. I liked the books advise, but wish it had more unique help for problems that spring along the way. I disappointed at some of the obvious and self-explanatory tips. So what do you think? Do you use any of these methods or do you have your own? Leave it in the comments below. 🔹


                                                            Citations 

Hamm, Jack. Drawing the Head and Figure. Time Warner International, 1963.
“The 12th Doctor .” The Mary Sue , The Mary Sue , www.themarysue.com/peter-capaldi-plays-doctor-one-last-time/.


Wednesday, December 27, 2017

Drawing a Child's Portrait

                                                                  By Lauren Davis

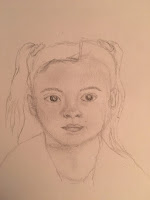
Another topic to bring up is the challenge of drawing children. They have different proportions then adults and take completely different techniques to accurately portray. With rounder cheeks, larger features and sweeter faces, they are an entirely new and difficult task for any artist. Even the hairstyles can be harder. The author recommends remembering many different points while drawing kids. He reminds the artist in include wider eyes, larger ears, thinner brows and longer lashes in young children. (Hamm 36) Here is the picture I came up with by using these techniques. I used Scarlett Estevez who is a ten-year-old actress as my model. (You may know her as Trixie from the TV show Lucifer on Fox.)


Step 1- Outline and Eyes 

I took the outline of the features from a photo of the actress I got from the show. In the book, the author said "The face is smaller in proportion to
the rest of the head. The back of the

head sticks out farther and the neck is smaller." (Hamm, 36) After the face is outlined, you need to perfect the eyes. the wider, brighter eyes have a sense of childlike wonder. Next get the precise eyebrow hairs and shape, ear size and hair. Then it's on to the shading.


                                                  Step 2- Shading 

             
After the outline looks how you want it to, you need to add
depth to the face. The shadows will be different than those on an adult face. With rounder cheeks and a more upturned nose, you have to change the places of light and dark. Author Jack Hamm said, " the early nose is usually upturned; the chin is less prominent and recedes; the mouth has more indentation in the corners." (Hamm, 36)  All of these crucial details can be achieved through careful and precise shading. It is very important to blend everything thoroughly to keep the illusion of roundness in the face. 


                                             Step 3- Hair and Final Touches 


With this particular photo, Scarlett was wearing pigtails. Nothing portrays youth and cuteness like a little girl hairstyle. Unfortunately, they proved to be insufferable to draw nicely. I was shocked at the difficulty of the adorable hairstyle. My technique of choice with hair is to start by picturing it as a shape. after getting the shape correct, then the tricky part is adding in hair strand textures. Then you can blend it out. I generally use a tissue for blending because it picks up less of the pigment than my usual finger blending. Then I just had to shade the shirt and neck and fix the jawline and I was done.


                                                       Final Thoughts


Overall, I did like the book's advice on children's portraits. It had helpful tips for shading and face shape. I'm happy with the finished product but I wish it looked more like the photo I based it off. So what do you think? Do you like the techniques the book's tips and tricks or do you have your own? 
Leave it in the comments below. 🔹


                                                          Citations 

Hamm, Jack. Drawing the Head and Figure. Time Warner International, 1963.

Drawing a Photo-Realistic Male Portrait

                                                        By Lauren Davis


One of my personal favorite techniques is making a photo into a drawing. Drawing photo-realistic portraits is a fun challenge for any aspiring artist. Along with trying to recreate a photo, this picture also applies the intricate and difficult techniques of a front male head. This is very different than the methods for a female head. The author, Jack Hamm, told the reader "Observe the interesting changes of planes in a face- look for them in the male head- and strive to record them." (Hamm, 35) This is my finished drawing, and the picture it is based on. (The photo is of Oscar Isaac, an actor whom I love from his role as Poe Dameron in Star Wars.)


Step 1- Outline and Shape 

 The first step in drawing a photo is the get the shapes just right. This can take a lot of trial and error, and that is great as long as the finished product looks like you want it too. You have less creative freedom when doing this, but it is a fantastic way to practice skills and techniques.
The eyes are always an identifying feature in people to make sure you get the lighting in the right place and the pupils at the right angle.
Hamm recommends trying different observing depth, width, lid formations and wrinkles in your drawing. (Hamm, 34) Then you are ready for the shading. 


                                                        Step 2- Shading 

  Shading a male face has many subtle differences from a female. Making the face appear masculine can be tricky and time-consuming. Hamm said, "Highlight strip above brows, upper eyelids hid, inside the eye in full shadow, set lines of mouth accented by double parentheses in cheeks, strong skeletal feeling beneath the flesh." (Hamm, 35) After shading in features, I had to shade the beard. Stubble can be hard to draw but it was an important part of this photo. Start with adding pigment, and then add texture and hairlines. 


                                           Step 3- Hair and Finishing Touches


Finally, I had to tackle the curly hair. If you haven't learned by now, I tried my best to get the hair correct but it didn't work quite right. After that, it was final fixes with the eyebrows and lips and done. 


                                                       Final Thoughts 

Overall the book gave fantastic advice on drawing a male portrait. I like the information about shading and shapes. I feel like this is definitely what the book has taught the best so far and I am happy with the information. A couple of my friends recognized who the picture was of without me telling them, so I call that a win. So what about you guys think? Do like this technique or do you have one of your own? Leave it in the comments below. ðŸ”¹


                                                        Citations 


Hamm, Jack. Drawing the Head and Figure. Time Warner International, 1963.
“Oscar Issac .” Creator/ Oscar Isaac , TV Tropes , tvtropes.org/pmwiki/pmwiki.php/Creator/OscarIsaac.


Monday, December 18, 2017

Photography- Portraits

In my free time, I love to take pictures especially Portraits. Portrait Photography is one the most common forms of photography. What portrait photographers do is to focus on the person’s face. They try to give the most focus on the face of the person because this will also be the focus of the photograph.

When I took a portrait photograph, on the left, it was of my sister. I used our backyard to take it on a sunny day. There were lots of flowers in the background, and my sister wasn't in the direct center of the photo, but it did not take away any attention from my sister because of the filters i used to enhance the photo. My second photograph, on the left, had may trees and bushes in the background but I kept my sister centered and the photo turned out beautiful.

The book, had some tips of taking a great picture. They also had some tips on how to control the color contrast.  In the book, The Kodak Library of Creative Photography: Extend your Range it says,"A graphic simplification of an outdoor half-length portrait was achieved, by using the different color contrasts to create a better resolution with the photograph" (Tresidder 69) . This has really helped me get a different and better view on portrait taking.  I used to think it was supposed to be a boring picture with an awkward stiff smile, but I was pleasantly surprised.

Overall, this book has helped me use whatever camera I have and make the most of it. What I loved the most about taking these pictures is that I could do anything I wanted with the picture. I loved that there were no rules!

Have you ever taken a portrait photo? Describe it.

Tresidder, Jack, The Kodak library of creative photography: extend your range. Kodak, 1985.

Sunday, December 3, 2017

Applying Portrait Photography Techniques - Ian Niblack

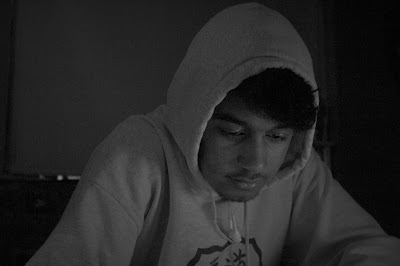
              My name is Ian Niblack, and I have always been intrigued by photography, but more specifically portrait photography. I find it fun to take candid pictures of people, or even planned photos, as well as being in them. I love the way a moment in time can be captured and remembered forever. But I've never really gone in depth with the intricacy surrounding photography until now. Using the book, "Photography: Guide to Taking Beautiful Digital Pictures, Photographs and compositions" by Nicole Woods, I was able to discover new techniques and apply them to taking portrait photos.


        Before, when I took Portrait shots, I would honestly just go for the shot without really paying much attention to detail, but after discovering new techniques from my book, I will now have good skills and habits to apply to my portrait shots forever. from the book I learned that I need a low aperture to give the image a shallow depth of field, which helps blur the background of a shot and focus in on the details of the subject's features. On Page 28 of my book, it says "It's better for portraits to have a shallow depth of field -- that way, your subject will be in crisp focus, while the background will be gently blurred." Taking this advice, I set the aperture on my camera to 4.5, so that the picture wasn't too dark in the lowly lit room, and so that I could apply a shallow depth of field to the portrait image.


I also decided to go with black and white for this photo, because it gives a more somber and smooth tone to the photo, and Black and White really helped me to express that into this image. In my book, on page 19, it says "Black and white and Sepia are very special ways of presenting images of a certain type and can really give you good results."

Thank you for Reading!


Sunday, January 29, 2017

New Views

                                           Book's Reference Photo

Face to Face

Seeing as this may be my last post I wanted to not only put in my last efforts to try and create at least an outline of a portrait, but an animal drawing as well. As seen in the photos I started off from a picture of a woman with a layered grid atop the photo. Using a grid did make it easier for me to draw the picture in different parts. It also allow me to be able to not be too overwhelmed by the picture's entire layout. Though the grid did make this whole process a lot easier, I still did find trying to capture the likeness of the photo onto the paper to be quite a challenge. I found it really frustrating to convince myself that I hadn't totally messed up the photo but as I drew in the lines and read the book (Lee Hammond's Big Book of Drawing) I saw it read "I know it looks funny (with the grid lines), but it helps keep things in the right place. Take your time and strive for accuracy." (Hammond 49). So from that helpful advice I continued to finish my outline but I didn't think I was ready to start filling it in just yet.

Seal of Approval

Since I didn't go further on my portrait drawing I decided to take a break from people and promote myself to start drawing animals. In my book when it comes to good animal drawings it states "The trick is using the dark areas and light areas together to create shape and blending to create realism." (Hammond 70). So basically when going about this it's best to know what shapes you're working with when drawing a certain animal and identifying the lighter and darker areas to achieve effective realism.

Seal Drawing
Towards the right you see my first drawing of an animal which happens to be a seal. I really enjoyed drawing such a cute and adored animal, but that wasn't necessarily the only reason I started with it. I believe the book starts out with this specific animal in order to get the reader better accustomed to learning how to shade animals. With this animal especially, it's an essential component to make it look real. Though I am now working with drawing an animal, similar components of drawing people still come into play like with the shaping of eyes and shading.

Closing

It was really interesting to not only attempt my first real portrait while trying to learn and apply the realism techniques I've learned. I also really found a joy in drawing animals which I look forward to continuing in the future. My question to you is if there was anything that you would be willing to learn to draw realistically, and what would keep you motivated to keep trying even if it didn't come out right the first few times? Thanks for reading and feel free to leave a comment below about any questions or critiques that you have, all of it is welcome!

 Hammond, Poly Lee. Lee Hammond's Big Book of Drawing. First ed. Cincinnati, OH: North Light, 2004. Print.