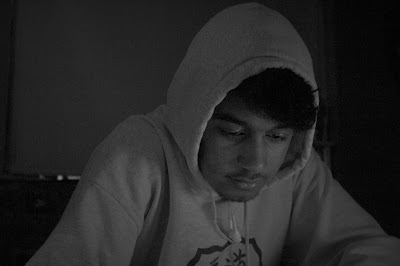
Before, when I took Portrait shots, I would honestly just go for the shot without really paying much attention to detail, but after discovering new techniques from my book, I will now have good skills and habits to apply to my portrait shots forever. from the book I learned that I need a low aperture to give the image a shallow depth of field, which helps blur the background of a shot and focus in on the details of the subject's features. On Page 28 of my book, it says "It's better for portraits to have a shallow depth of field -- that way, your subject will be in crisp focus, while the background will be gently blurred." Taking this advice, I set the aperture on my camera to 4.5, so that the picture wasn't too dark in the lowly lit room, and so that I could apply a shallow depth of field to the portrait image.
I also decided to go with black and white for this photo, because it gives a more somber and smooth tone to the photo, and Black and White really helped me to express that into this image. In my book, on page 19, it says "Black and white and Sepia are very special ways of presenting images of a certain type and can really give you good results."
Thank you for Reading!
Hi, I'm in second year photography and our assignment this weekend was environmental portraiture and this blog will really help me make my pictures better. Thanks for the information!
ReplyDeleteNo problem and thank you for your interest in my posts! I will be sure to bring more diverse information to the table.
DeleteHi Ian, I'm also in 2nd year photography with Polina. I have used these techniques for portraiture in the class, and it works really well. Our recent assignment was to do environmental portraiture, where we capture our subject, but also the background and environment around them to make better understanding of the subject! I'm thrilled to see what other techniques Nicole Wood teaches you next.
ReplyDeleteHi Ashley! I'm glad you found my blog useful. I can assure you the next one will have just as great information!
Delete