Gorgeous Hair Curling Tutorial
I n t r o d u c t i o n
These curls will make you look fabulous for any event. For this tutorial, I will be using a 25mm, or one-inch, barrel to curl my hair. With this wand, you'll achieve beautiful curls that aren't too big and bombshell-like, or too tight and crimped-like. Michelle Phan and her novel; Make Up: Your Life Guide to Beauty, Style, and Success -- Online and Off, gives us the tips and tricks that we need to accomplish this look!
S t e p O n e :
 First, make sure to turn on your curling wand. Preheating your tool gives it enough time to warm up to the desired heat, because if it is too cold, you will not be able to form any curls because the enzymes in your hair will not be able to heat up and become flexible. But, if it is too hot, you might risk burning your hair. It is also important to figure out what kind of barrel you want, the texture and size it will leave your hair in the end. According to the book, "Smaller barrels result in tighter curls; larger barrels create looser curls," (Phan 94). Let your curling iron or wand sit on a platform that will not burn or melt.
 S t e p T w o :
This next step is also a key for this tutorial, you want to prepare your hair. You can either use first or second day hair, as long as it is completely dry. My first product that I would recommend would be dry shampoo, to add a little volume in your hair and to absorb any oil. Any serums or mousse should be used after a shower as your hair dries so that all of the product can be absorbed and used at it's potential. Then, use a heat-protectant spray on your dry, combed hair-- the name says it all!
S t e p T h r e e :
Now that your hair and curling tool is set up, we can begin curling. Depending on how much hair and how long your hair is, you will part it into different sections to accomplish more volume and curls. For me, I split it into 3 horizontal sections, starting from the bottom and tying the rest of my hair up so it is out of the way of when I curl and out of my face. Then, if you do have a heat-protecting glove, you can put that on now, if not, you'll just have to be more cautious about your fingers when you curl closer to the barrel. Take sections more or less about one-inch, depending on how many curls you want in the end, or how loose of a curl you want to obtain. Next, wrap the hair around your barrel and keep it in place from five to seven seconds. The longer you leave it, the more developed the shape, but if you leave it too long, you're at a great risk of burning your hair and achieving a frizzy curl. Continue to go through your hair and sections until you finish, alternating the direction you curl whether it be clockwise or counter-clockwise, this technique creates more dimension.
S t e p F o u r :
The final step would be to rustle through your hair, loosening your curls and separating them to create more volume and texture. Flip your hair back and forth, even going upside down to create more bounce. Then, get your hair spray to finish off the romantic curls. Make sure to spray a couple of inches away and evenly distribute the product.
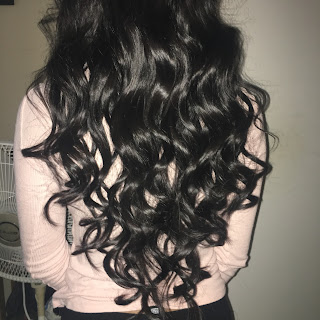 F i n i s h e d

Now you're ready to go! How long does it usually take you to curl your hair? Are there any tips and tricks you know of? Leave some comments down below!
Phan, Michelle. Make up: Your Life Guide to Beauty, Style, and Success--Online and Off. Harmony Books, 2014.
Phan, Michelle. Make up: Your Life Guide to Beauty, Style, and Success--Online and Off. Harmony Books, 2014.
Hey Alexis love those bouncy curls. They look great. I always like curling my hair for night out events. This was a really helpful guide to learn how to curl my hair better. Something I really liked about it was that it had step by step process.
ReplyDeleteYour curls look great! I love how you made a detailed list of what to do from start to finish. It is also would be very helpful for anyone who hasn't ever curled their hair before. For reference, what curler size do you use?
ReplyDeleteHi Alexis, your curls look so defined and beautiful! I've been watching Michelle Phan on YouTube for a while now. She's a good and credible beauty guru so I'm glad you chose her book for your blogs. When I curl my hair, it usually takes about 40 minutes because my hair is long and also really thick. Maybe a larger wand like the one in this blog will shorten the time frame a bit. I was wondering, what do you think is more harmful for your hair: a curling-wand or a straightening iron?
ReplyDeleteI really enjoyed how you listed everything step by step and to answer your question, I have never been a fan of curling because it would take me about 40 minutes on either side and as you work on your other side you realize how different they look! I think I am going to try curling again and use the steps you listed.
ReplyDelete